
When you install your OBDLink® adapter and connect to the OBDLink app, several dashboard screens with important gauges are displayed, including engine RPM, vehicle speed, oxygen sensors, and others. The default gauges display Parameter IDs (PIDs) that are common to most OBD-II compliant vehicles and are included in the Society of Automotive Engineers (SAE) standard.
This article contains several detailed examples of how to display a vehicle’s transmission temperature. This PID is defined by the vehicle’s original equipment manufacturer (OEM). OEMs are not required to use the same PID name, therefore it may be confusing to find a certain OEM’s PID for transmission temperature. The OEM PID reference section lists details for several OEM transmission temperature PIDs that have worked for OBDLink customers. This article includes examples for Ford and GM PIDs.
| OEM | PID Name |
|---|---|
| Ford | Transmission Fluid Temperature (°C, °F) |
| GM | Transmission Fluid Temp |
Note: We recently updated the OBDLink app and made improvements to its features and how it looks. Download the latest version of the OBDLink app from the App Store (iOS) or Google Play (Android) to take advantage of the updated app's features and performance.
TABLE OF CONTENTS
- Manufacturer PIDs
- Example 1: 2013 Ford Escape using iOS device
- Example 2: 2023 Chevrolet Malibu using Android device
- Troubleshooting
- OEM PID reference
- Next steps
- Learn more
- Need more help?
Note: This article is focused on the OBDLink® MX+ adapter, because enhanced diagnostics for many vehicles are included free of charge in the OBDLink app with your purchase. Add-ons that are exclusive to OBDLink MX+ include: GM; Honda, Acura; and Hyundai, Kia. If you have another OBDLink adapter model, then you can purchase add-on diagnostics, but they are not guaranteed to access all OEM-specific PIDs/DTCs. For example, if you have an OBDLink LX adapter and a Ford vehicle, you can purchase the Ford add-on, however, you will not be able to read certain Ford PIDs that come from the MS-CAN network.
If you have questions that aren’t answered by this article, contact Support using the OBDLink app by tapping Settings > Contact Support.
Manufacturer PIDs
The OBDLink app includes some preset Manufacturer PIDs that are not included in the OBD-II standard.
View the list of Manufacturer PIDs by tapping Settings > Manufacturer PIDs.
Note: If you don’t see this option, then we recommend that you update your app version.
At this time, Manufacturer PIDs includes sections for these vehicles:
- GM - CAN: for vehicles that use the CAN protocol (typically, vehicles from 2007 and newer)
- GM - J1850: for vehicles that use the J1850 protocol (typically, vehicles from 1996-2006)
- SUBARU - CAN: for vehicles that use the CAN protocol (typically, vehicles from 2007 and newer)
If you don't have a GM or Subaru vehicle, you can access Manufacturer PIDs using enhanced OEM add-ons, described in the examples in this article.
You can display a Manufacturer PID on the Dashboard tab as a new gauge. See Example 2 in this article to display transmission temperature on a GM vehicle using a Manufacturer PID.
Learn more about other dashboard gauge features in this article: Add and Edit Dashboard Gauges
Example 1: 2013 Ford Escape using iOS device
Before you begin, be sure to:
- Start your vehicle.
- On your phone/tablet, open the OBDLink app and connect to your OBDLink adapter.
- Make sure your phone/tablet is not streaming to any other Bluetooth/BLE devices.
- Confirm that your phone/tablet is Connected to the OBDLink adapter.
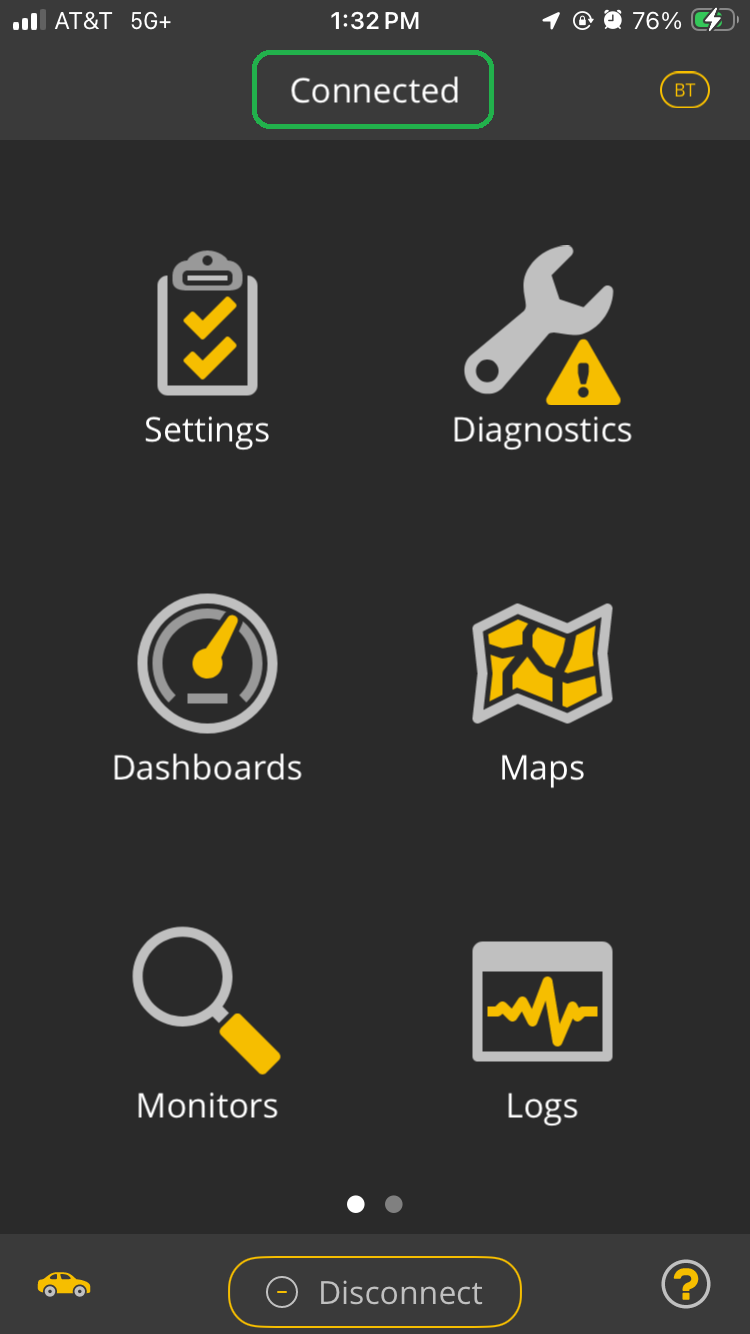
- In the OBDLink app, navigate to Settings > Get Enhanced OEM Add-Ons.
Note: Enhanced OEM Add-Ons are only for vehicles sold in North America.
If you already installed Enhanced OEM Add-Ons, skip to step 3.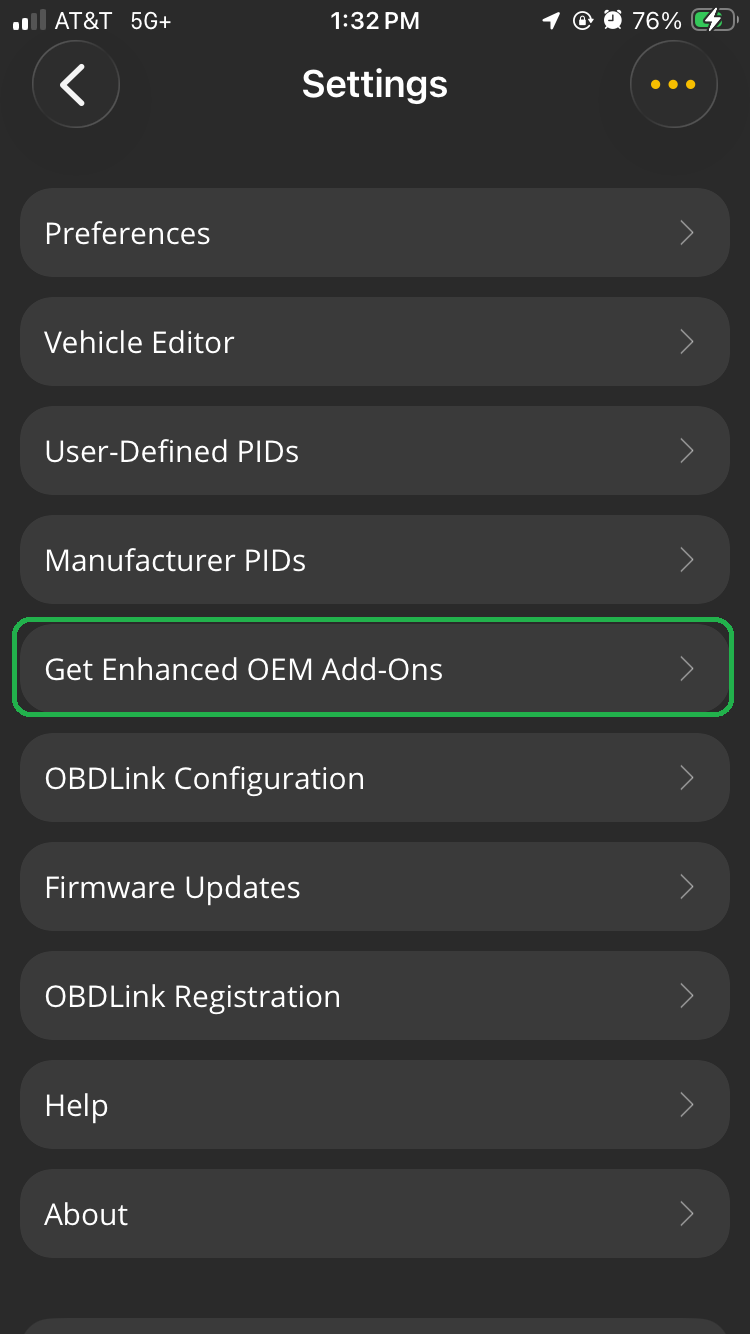
Select your vehicle OEM, select the trouble codes for your model year, and tap Get.
For our example, we selected Ford, Lincoln, Mercury and Ford 2013 Enhanced Diagnostics to install enhanced trouble codes for a 2013 Ford Escape vehicle.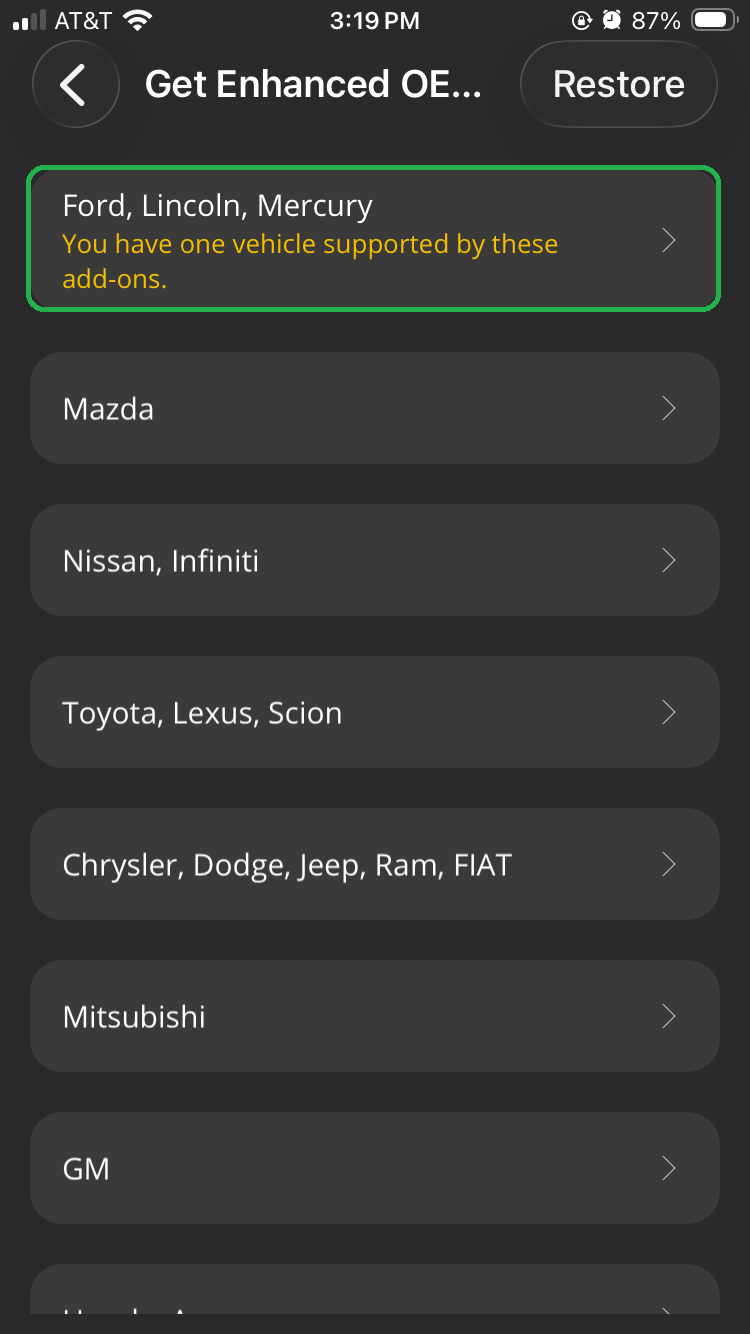
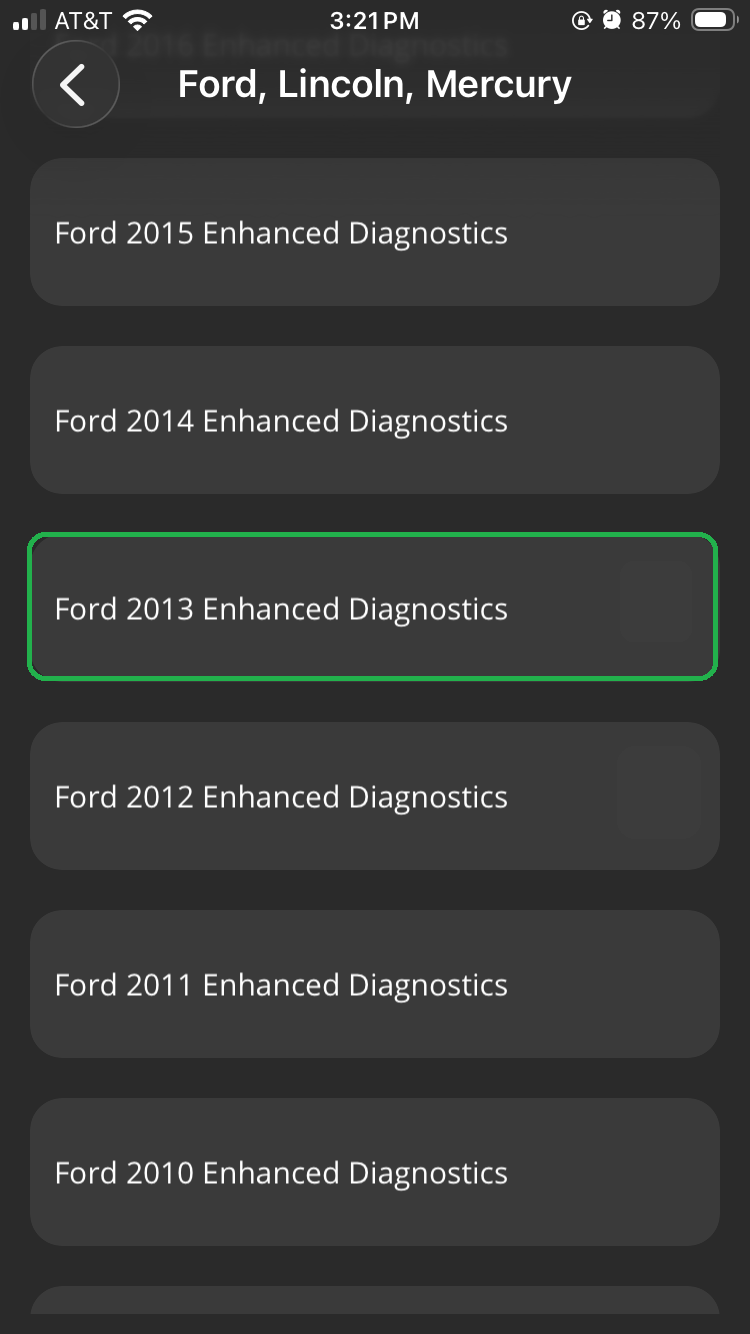
After the enhanced OEM add-ons are installed, your OBDLink adapter will be disconnected.
In the Home screen, tap Connect to connect to your OBDLink adapter.
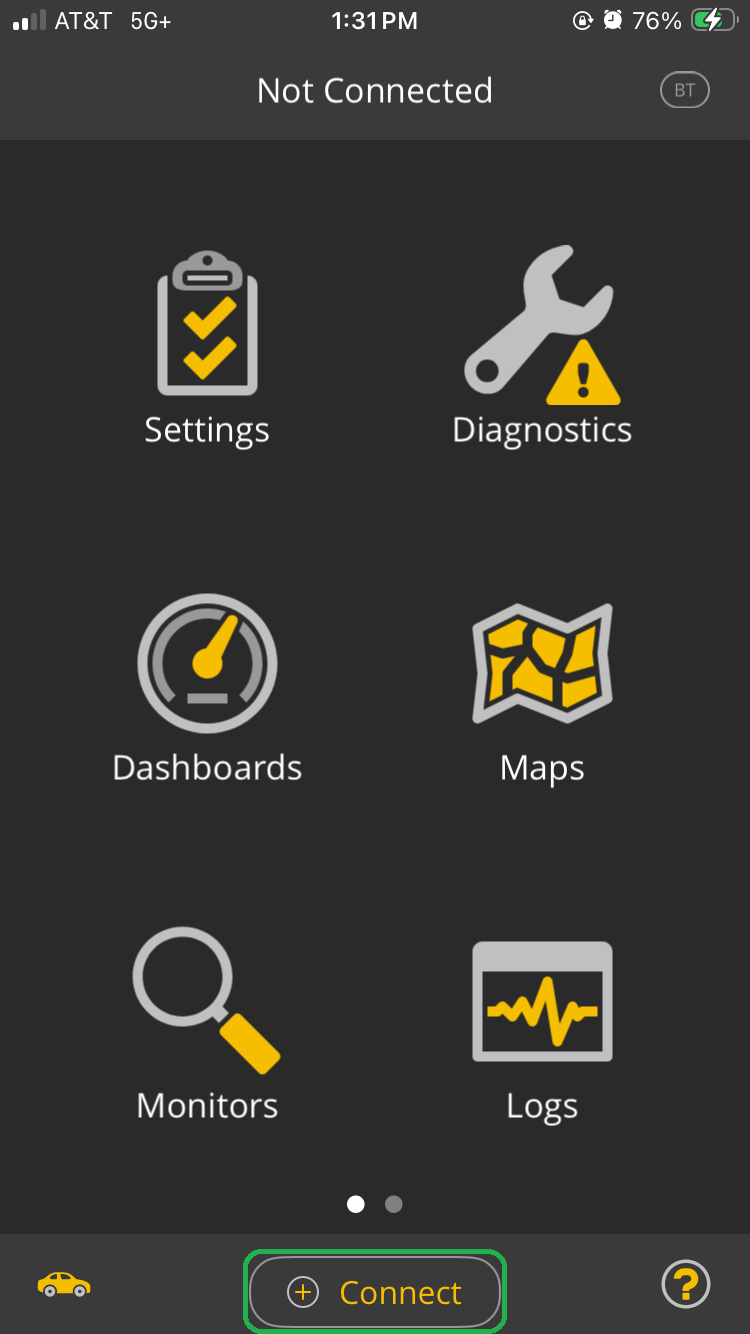
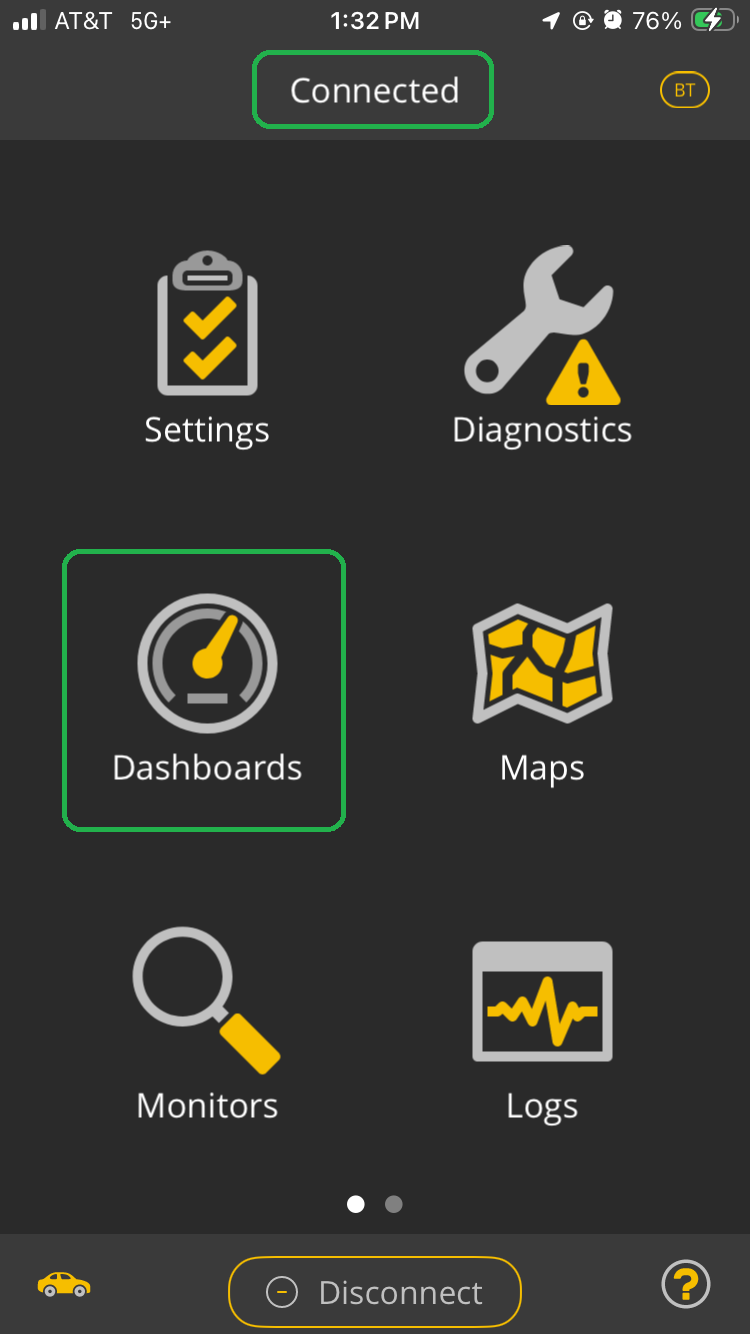
From the app's Home screen, confirm that your adapter is Connected and tap the Dashboards icon.
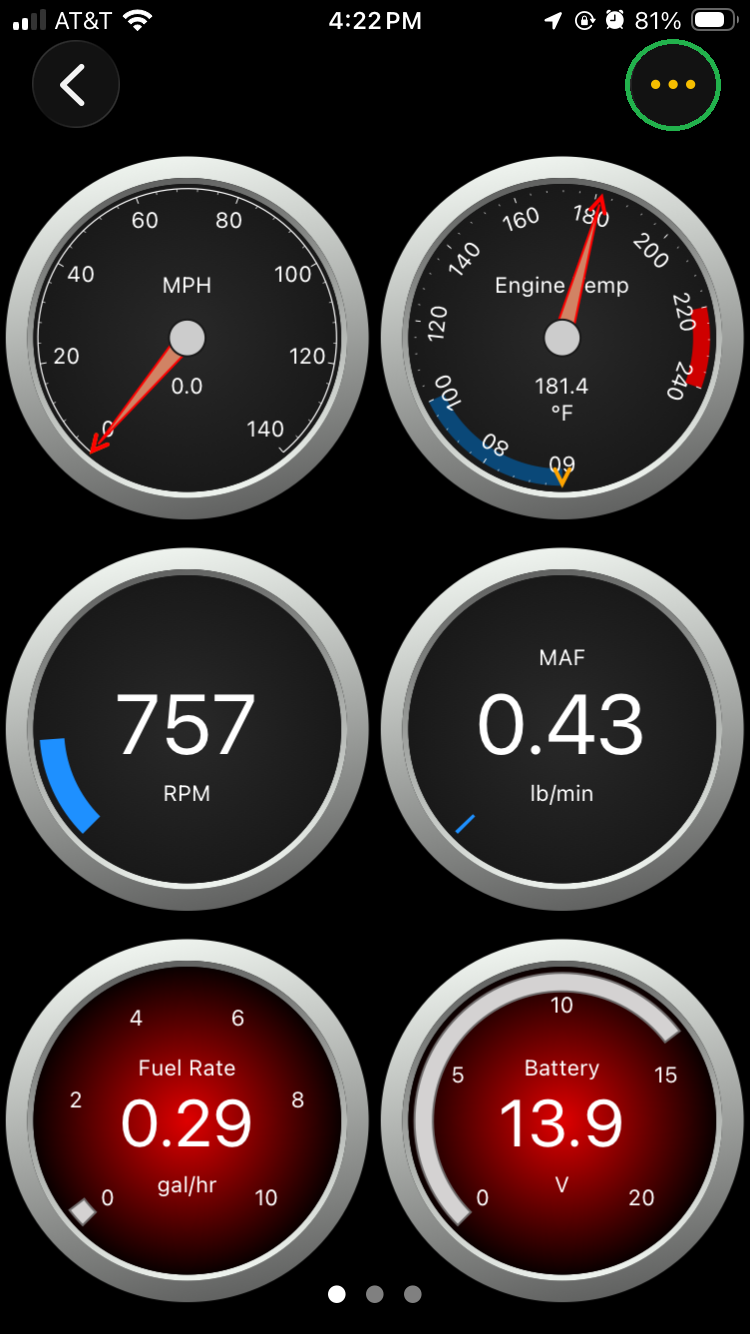
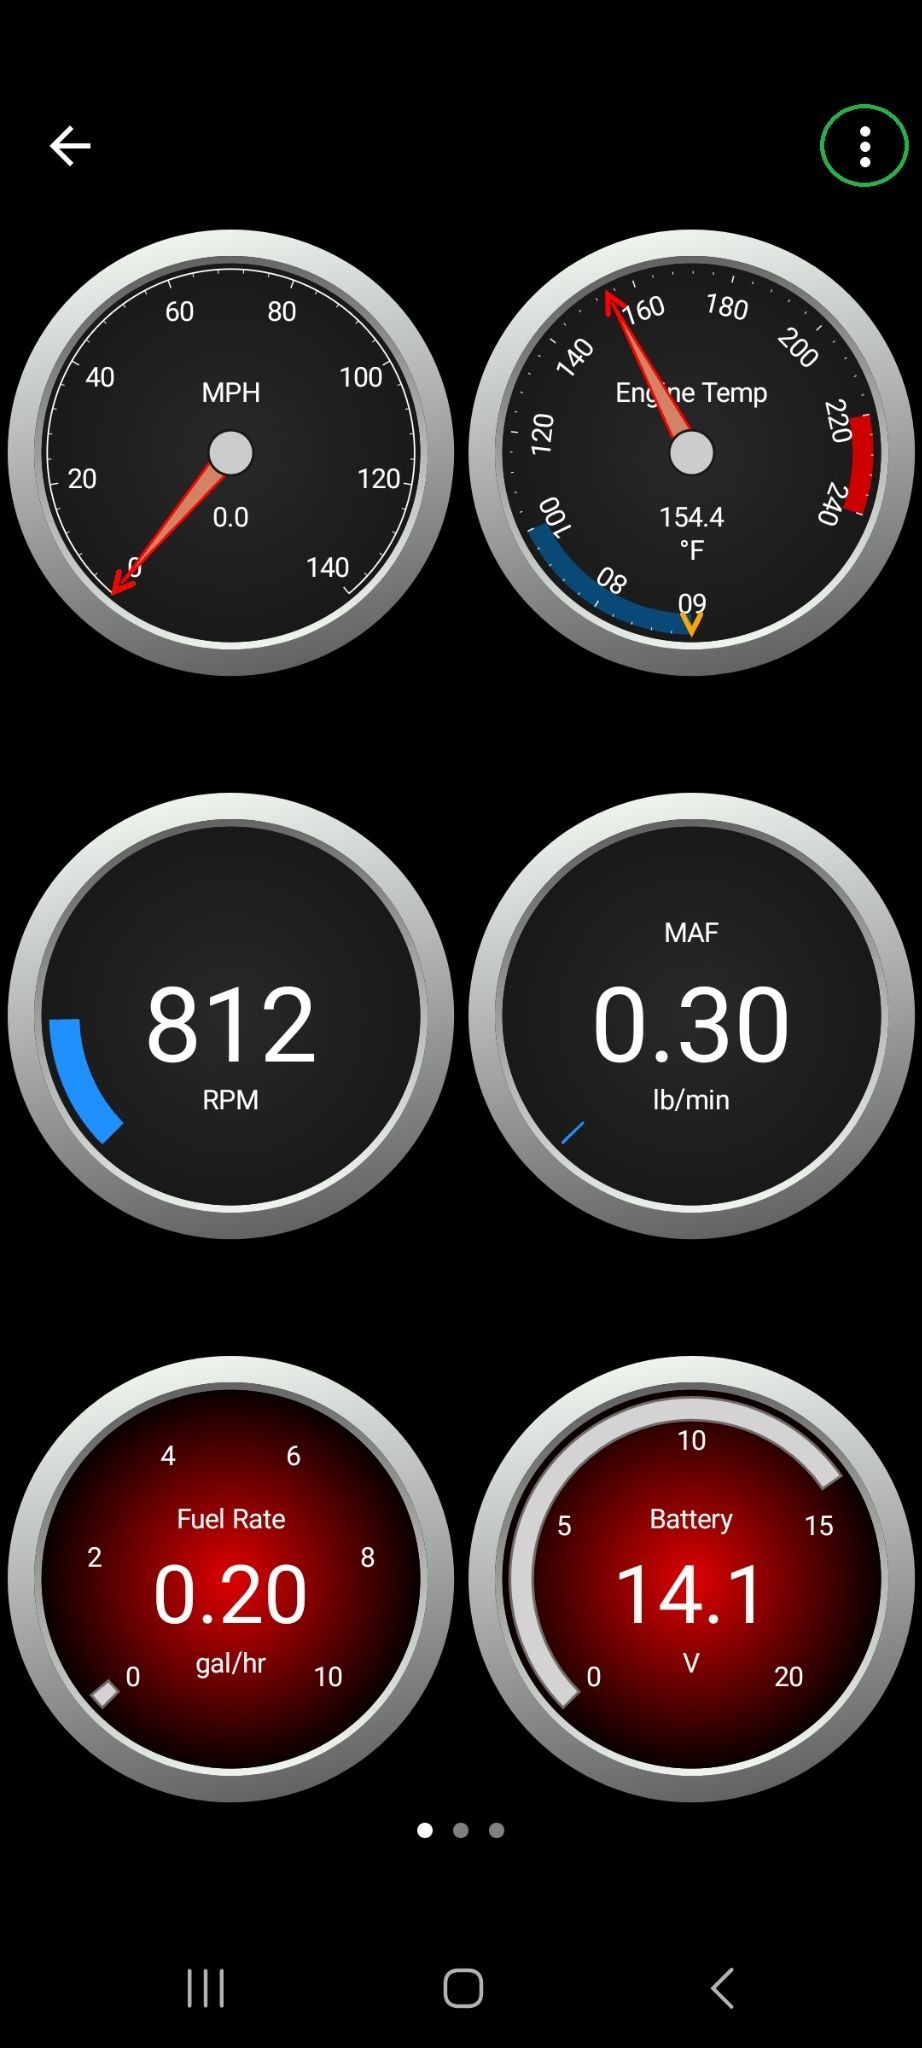
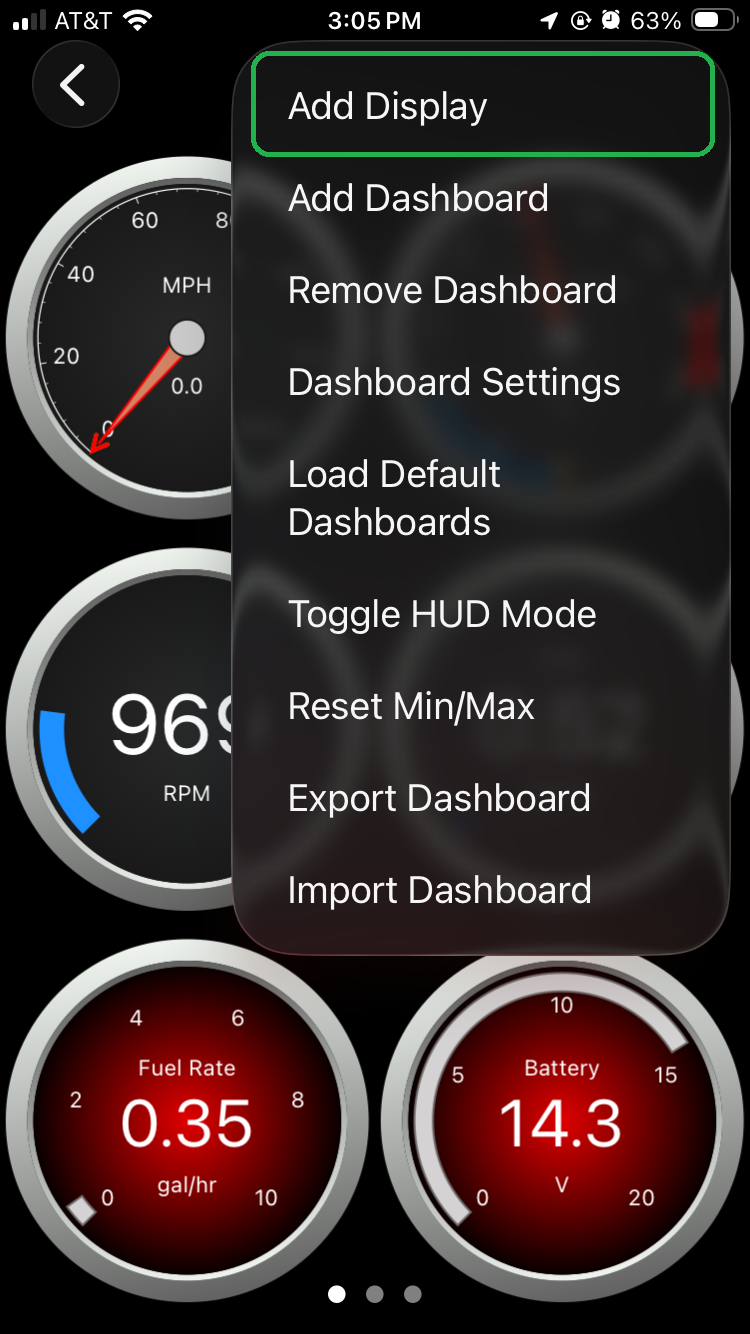
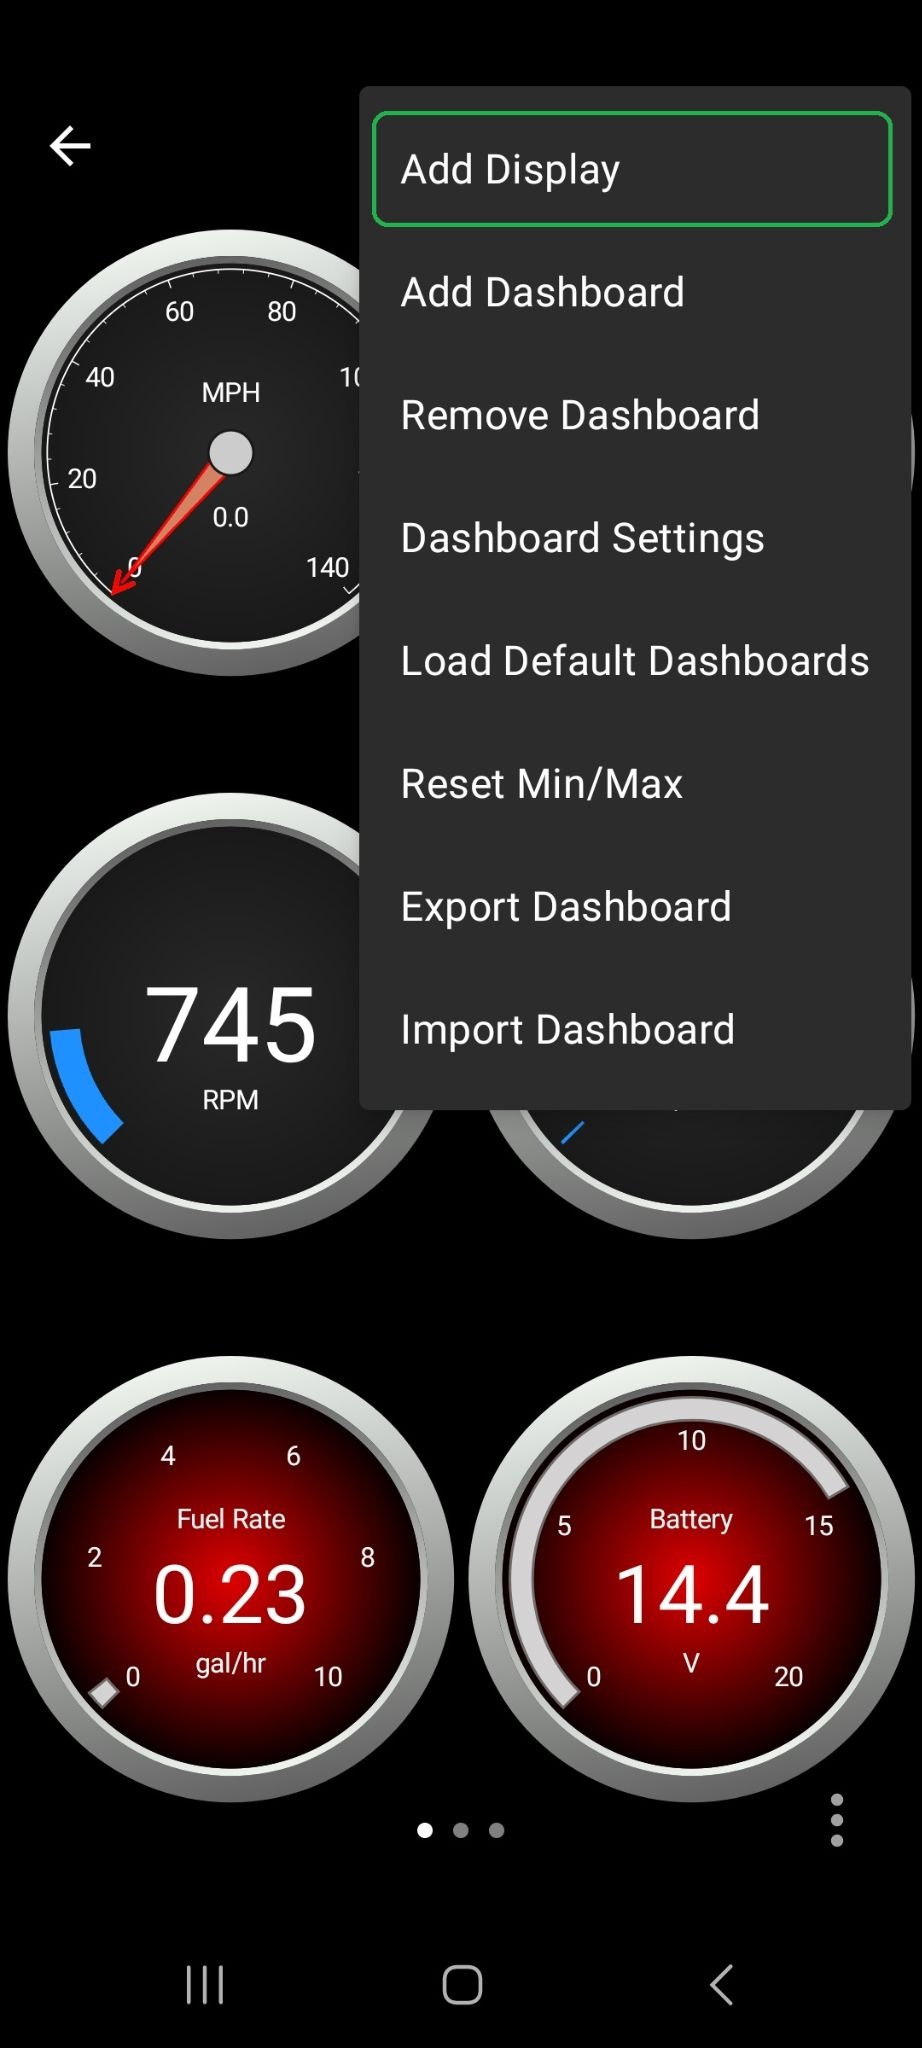
Tap the 3 horizontal dots (iOS) or 3 vertical dots (Android) menu button in the upper right corner.
Tap Add Display to add a new gauge to the current dashboard page.
Select the gauge type on the Display Type menu, then tap the forward arrow (>).
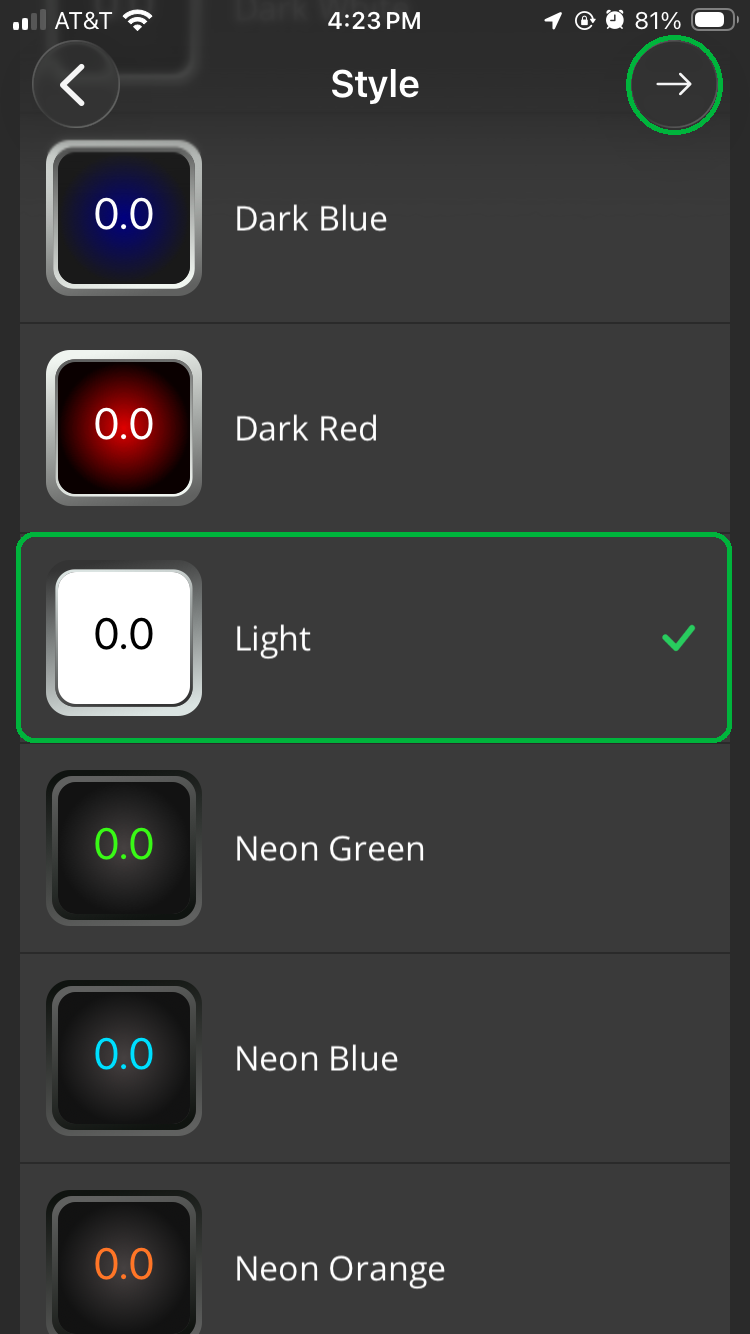
Select the gauge color on the Style menu, then tap the forward arrow (>).
In our example, we selected Digital Gauge and Light.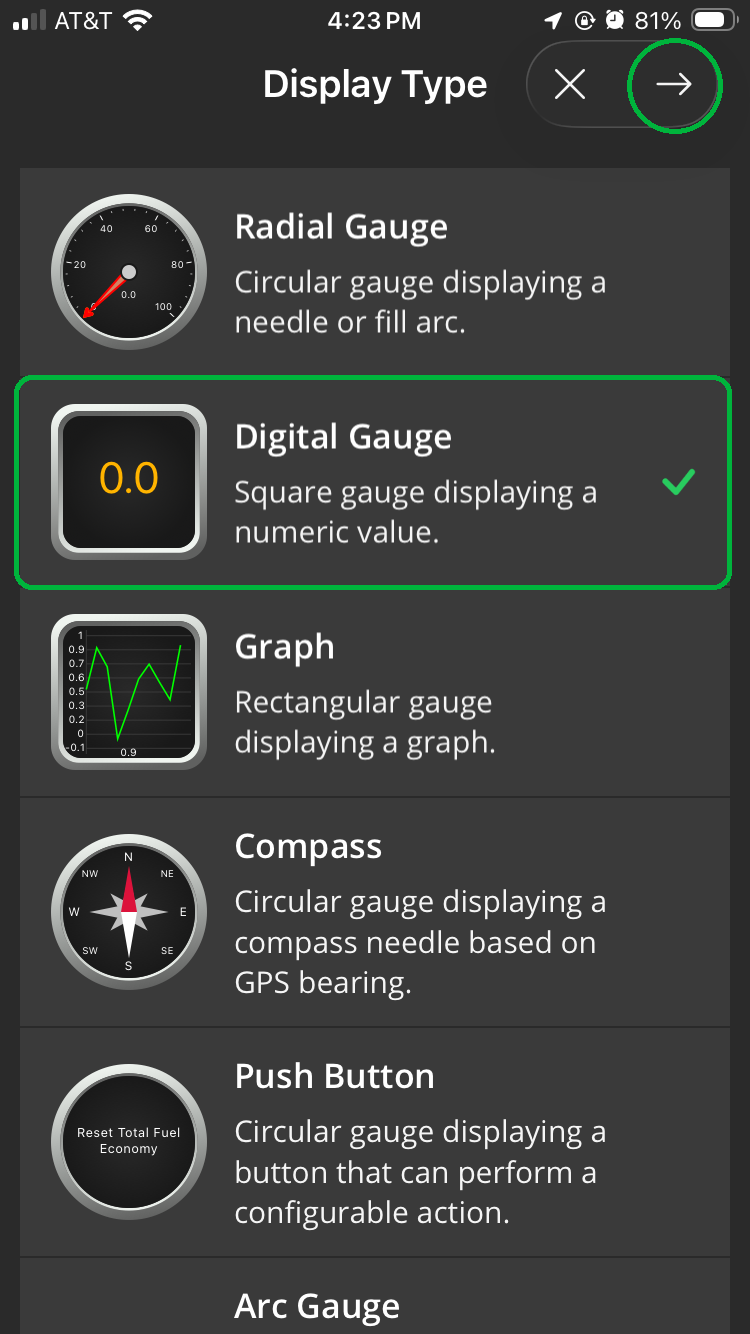
On the Display Configuration menu, tap the forward arrow in the PID section to open the Select PIDs menu.
On the Select PIDs menu, tap Ford, Lincoln, Mercury.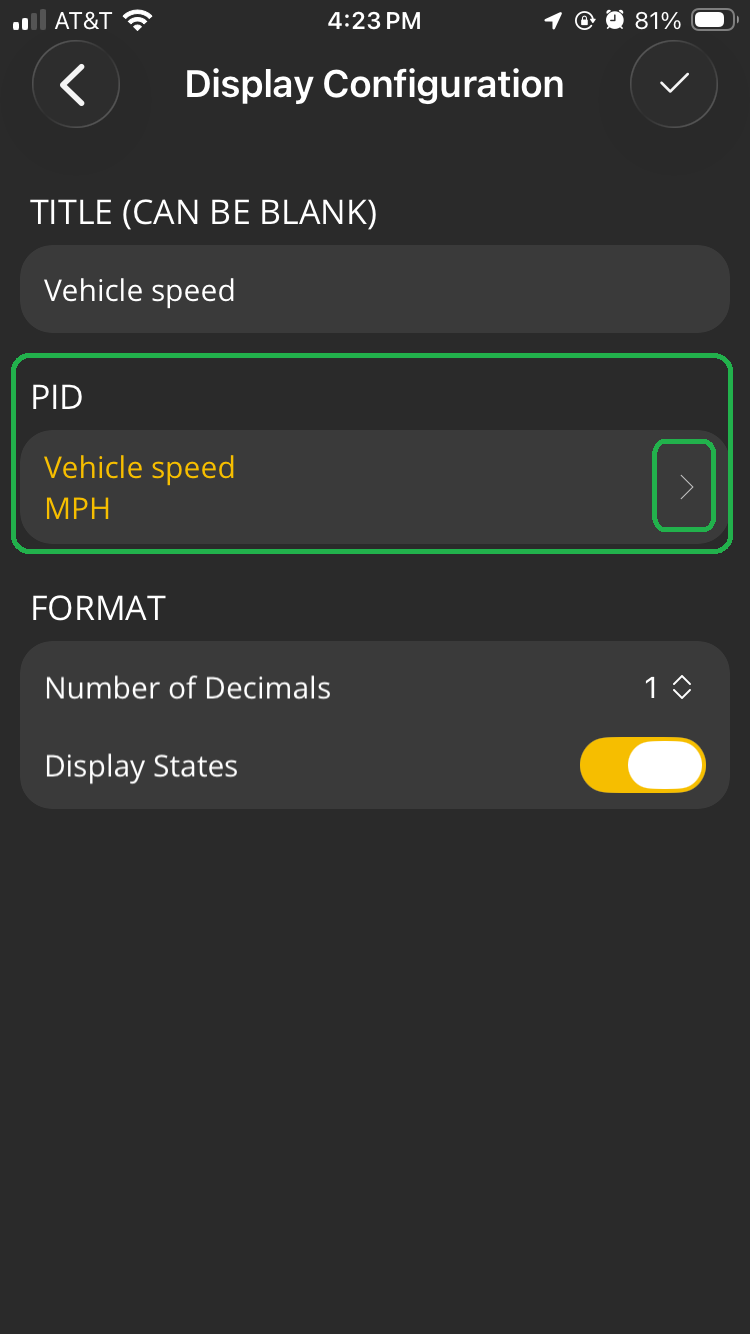
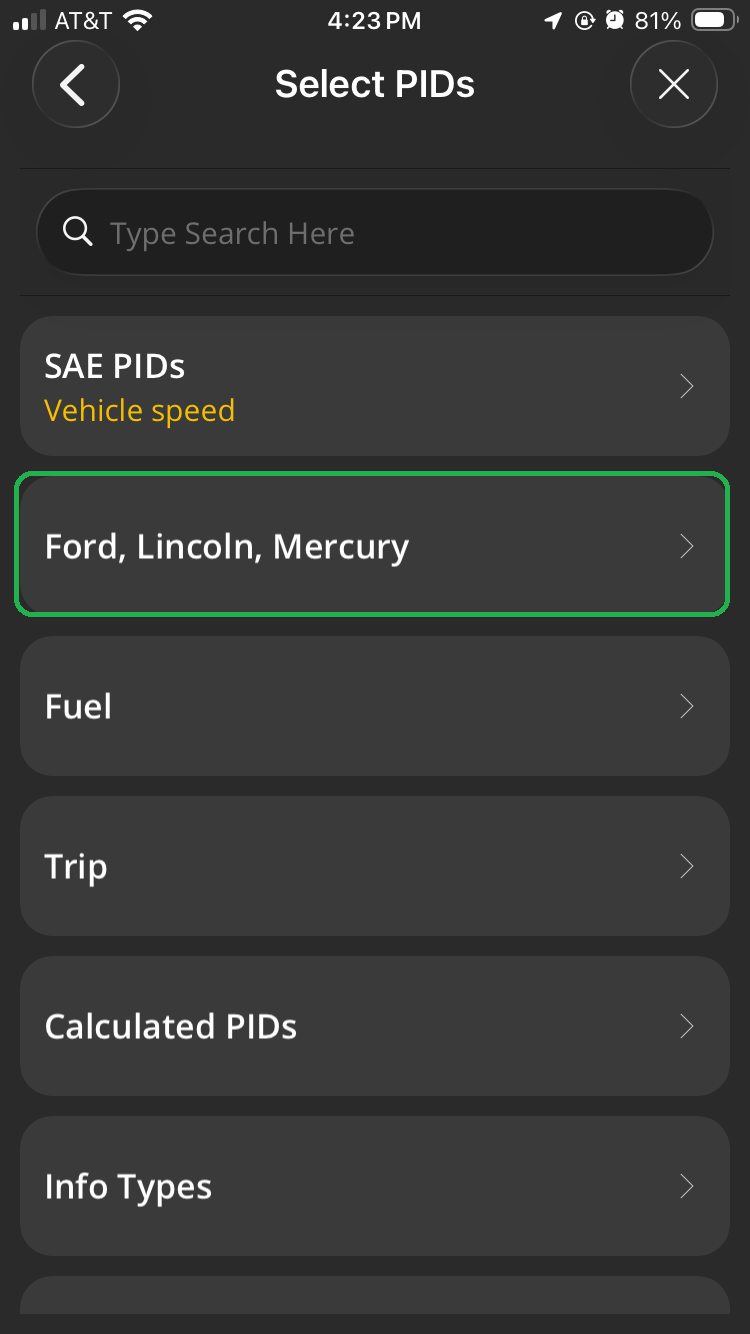
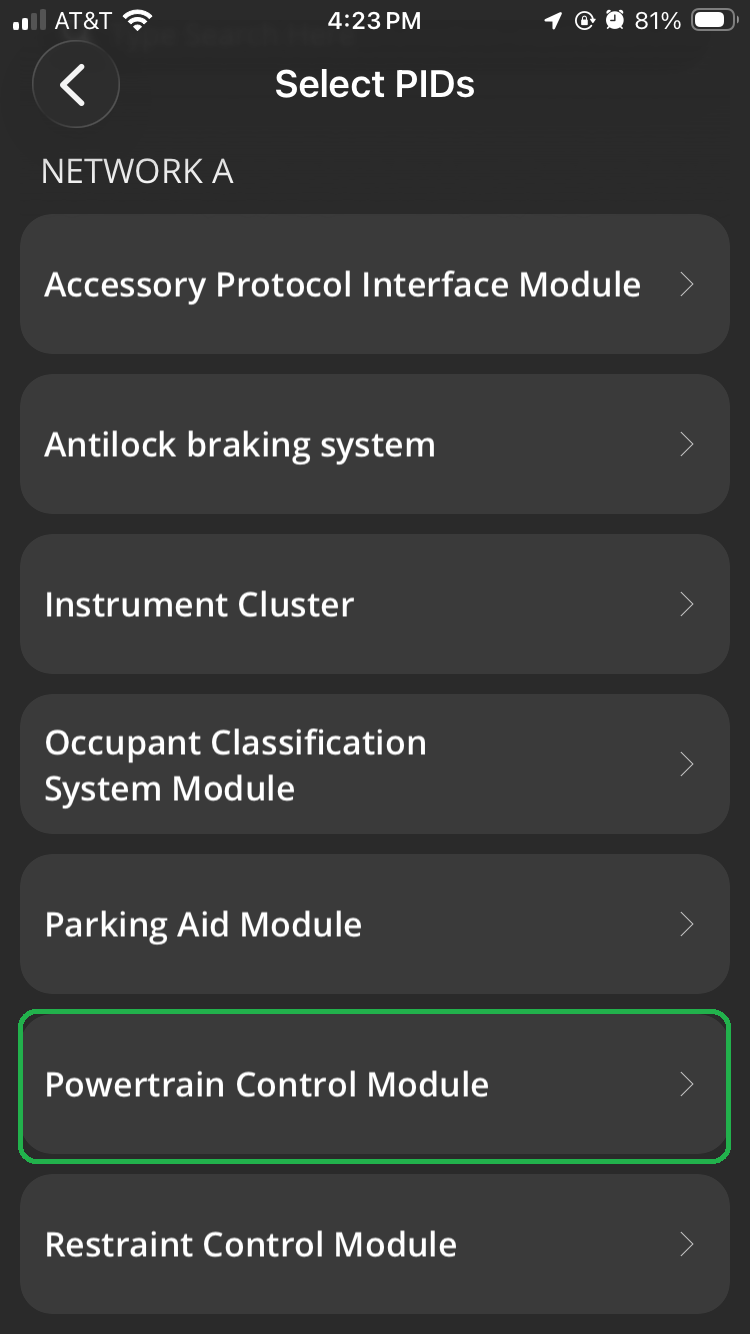
Tap Powertrain Control Module, select Transmission Fluid Temperature (°F), and tap the checkmark (✓) in the upper right corner to save the display.
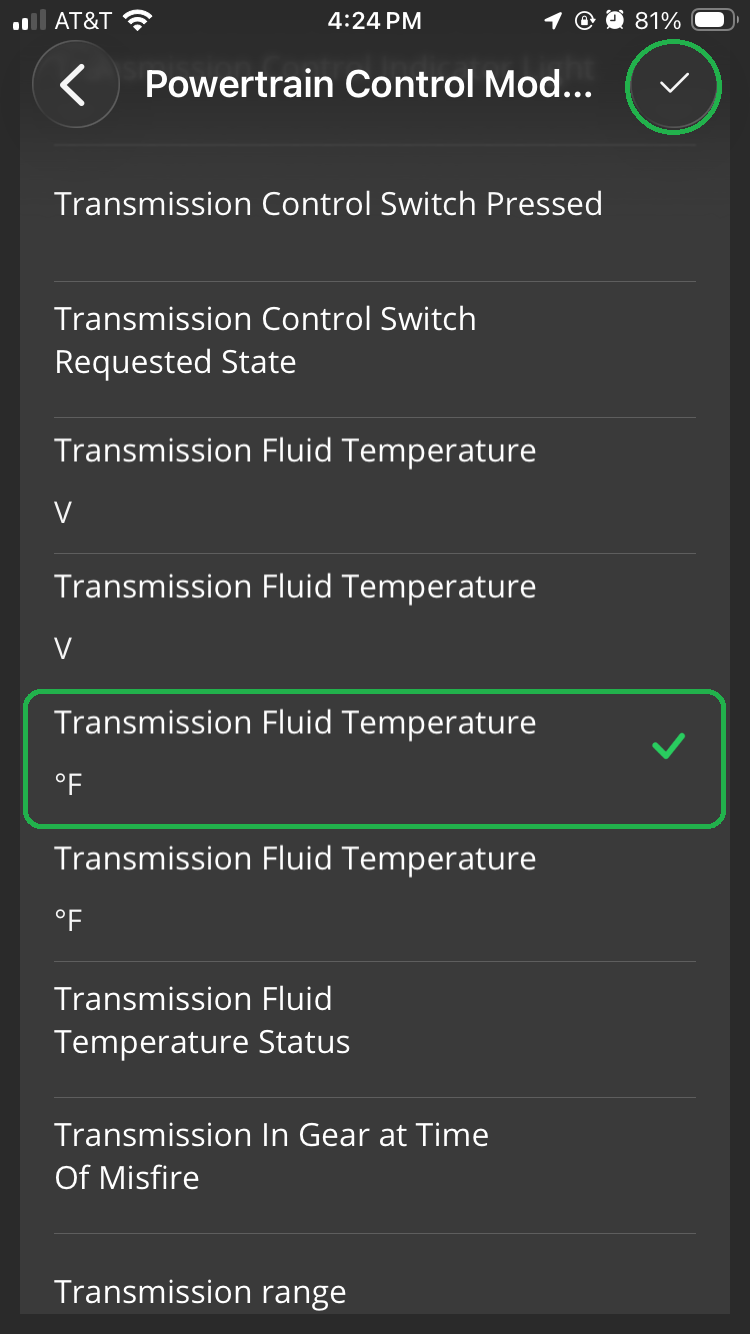
You can edit the gauge title if you’d like, then tap the checkmark (✓) in the upper right corner to save the display.
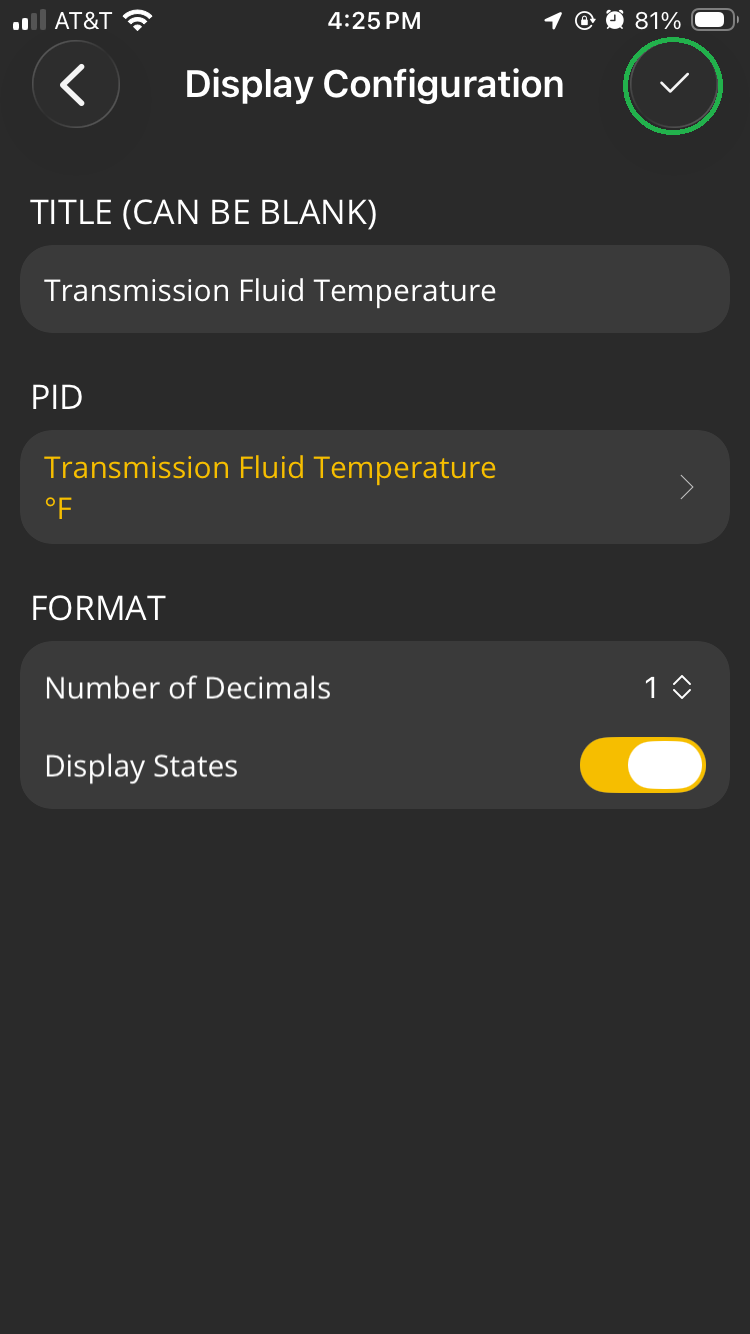
You will see the new gauge displayed on the dashboard. Tap and hold the gauge to open the Edit Display menu and tap Drag and Move to move the gauge on the dashboard screen.
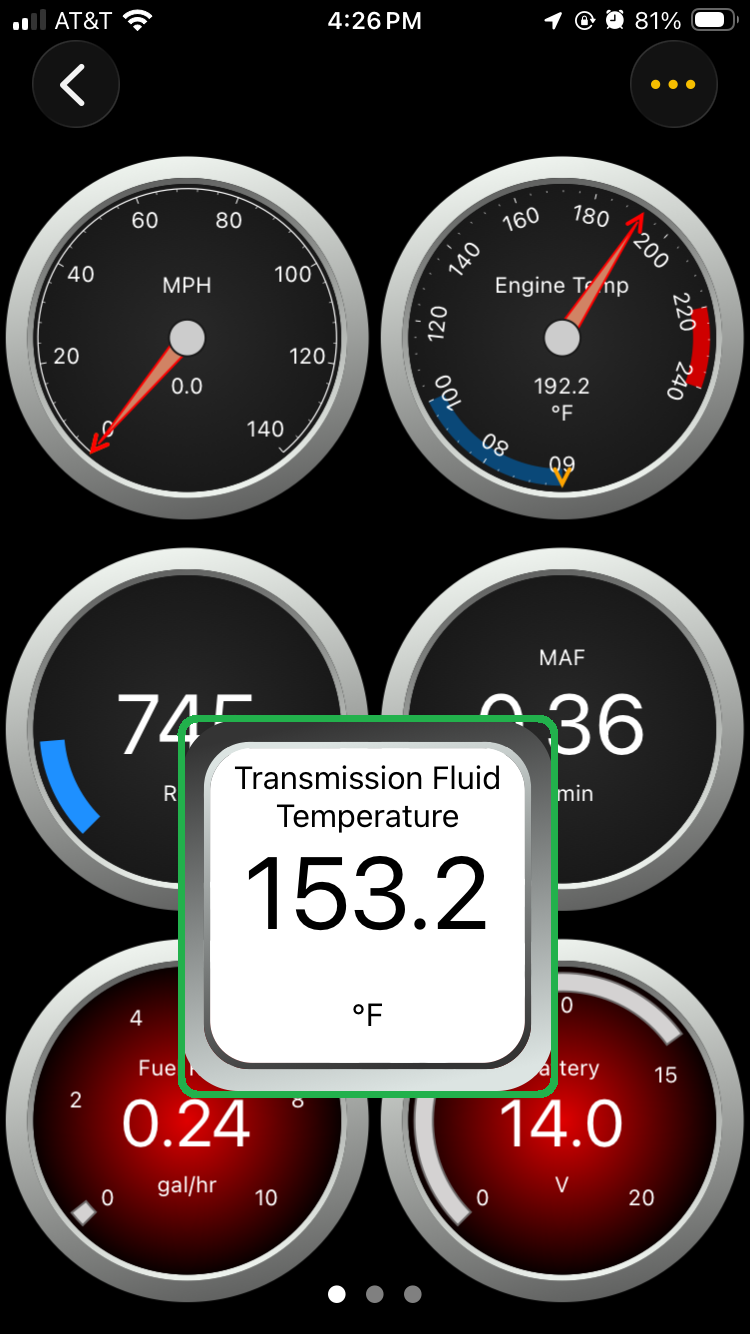
Tip: If the new gauge shows 0.0, try swiping to a different dashboard page, then swipe back. The OBDLink app may load values in the new gauge when it refreshes the page.
For more help, see the Troubleshooting section.
Example 2: 2023 Chevrolet Malibu using Android device
Before you begin, be sure to:
- Start your vehicle.
- On your phone/tablet, open the OBDLink app and connect to your OBDLink adapter.
- Make sure your phone/tablet is not streaming to any other Bluetooth/BLE devices.
Note: Step 2 below is optional because you don’t need OEM enhanced add-ons to read Manufacturer PIDs. However, we recommend that you complete this step now because you’ll need them to read Diagnostic Trouble Codes (DTCs) for your vehicle.
- Confirm that your phone/tablet is Connected to the OBDLink adapter.
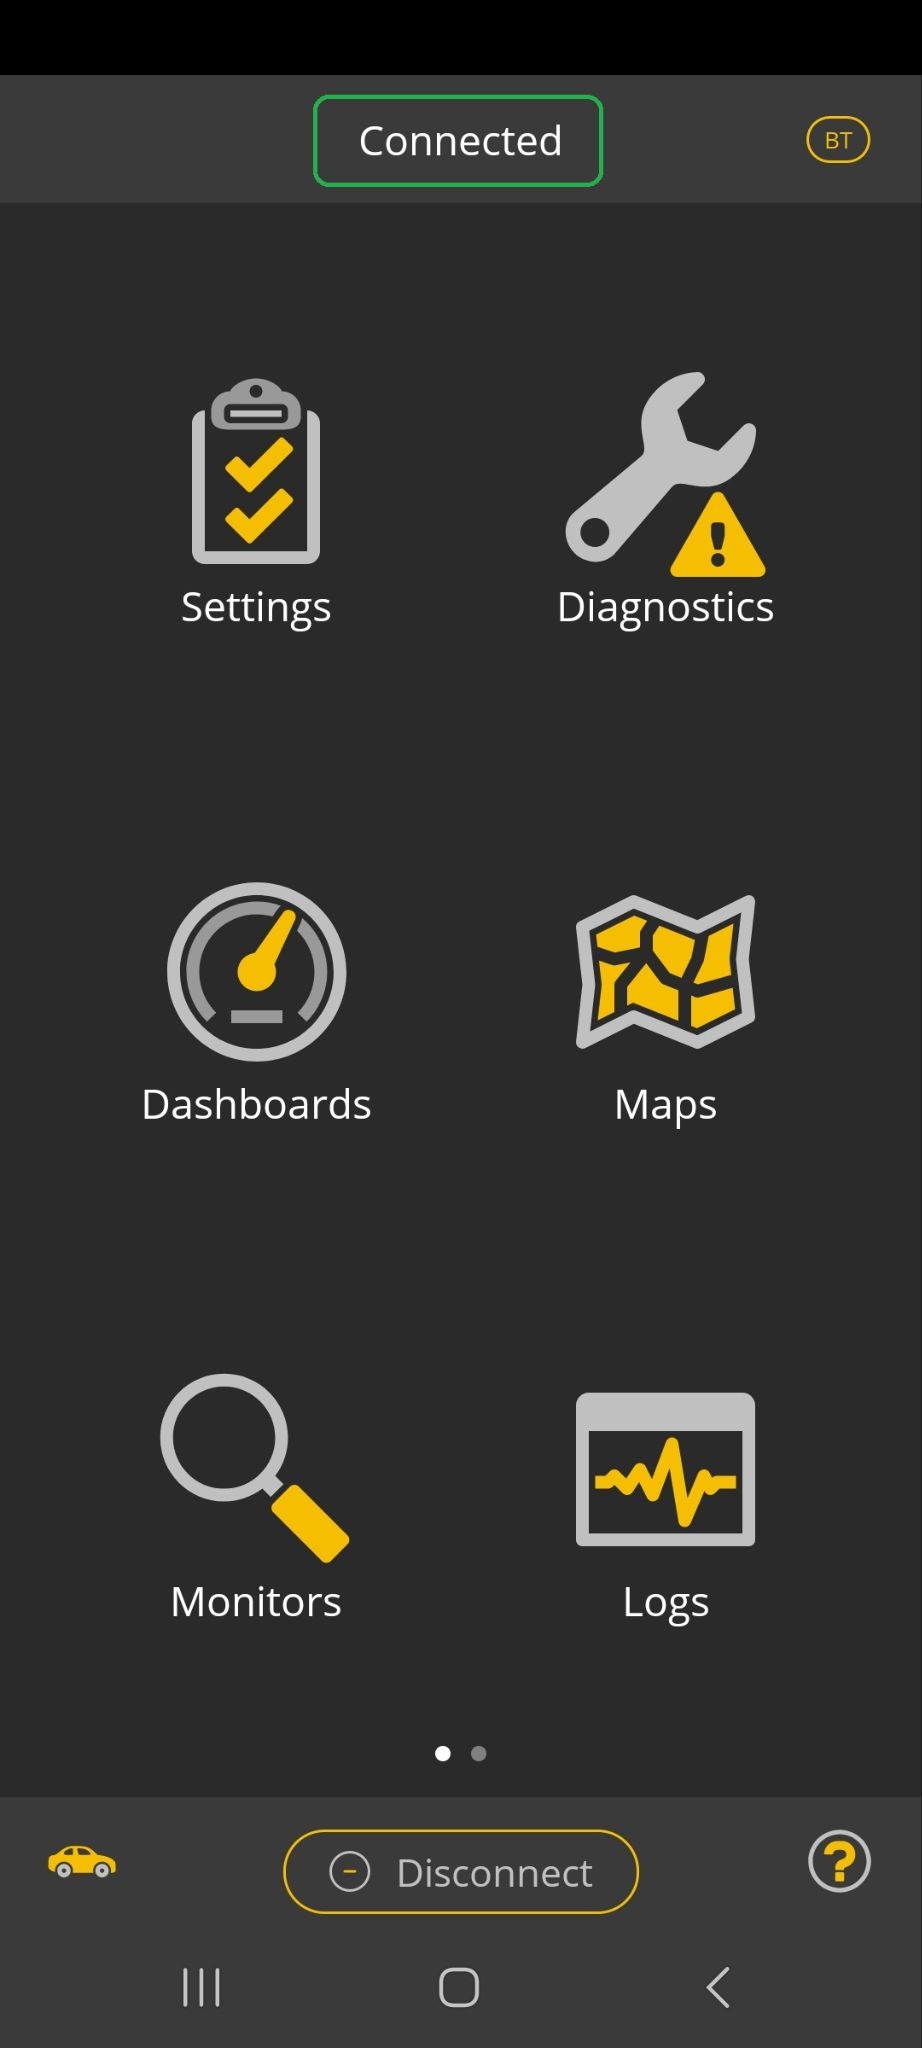
- (Optional but recommended)
In the OBDLink app, navigate to Settings > Get Enhanced OEM Add-Ons.
Note: Enhanced OEM Add-Ons are only for vehicles sold in North America.
If you already installed Enhanced OEM Add-Ons, skip to step 3.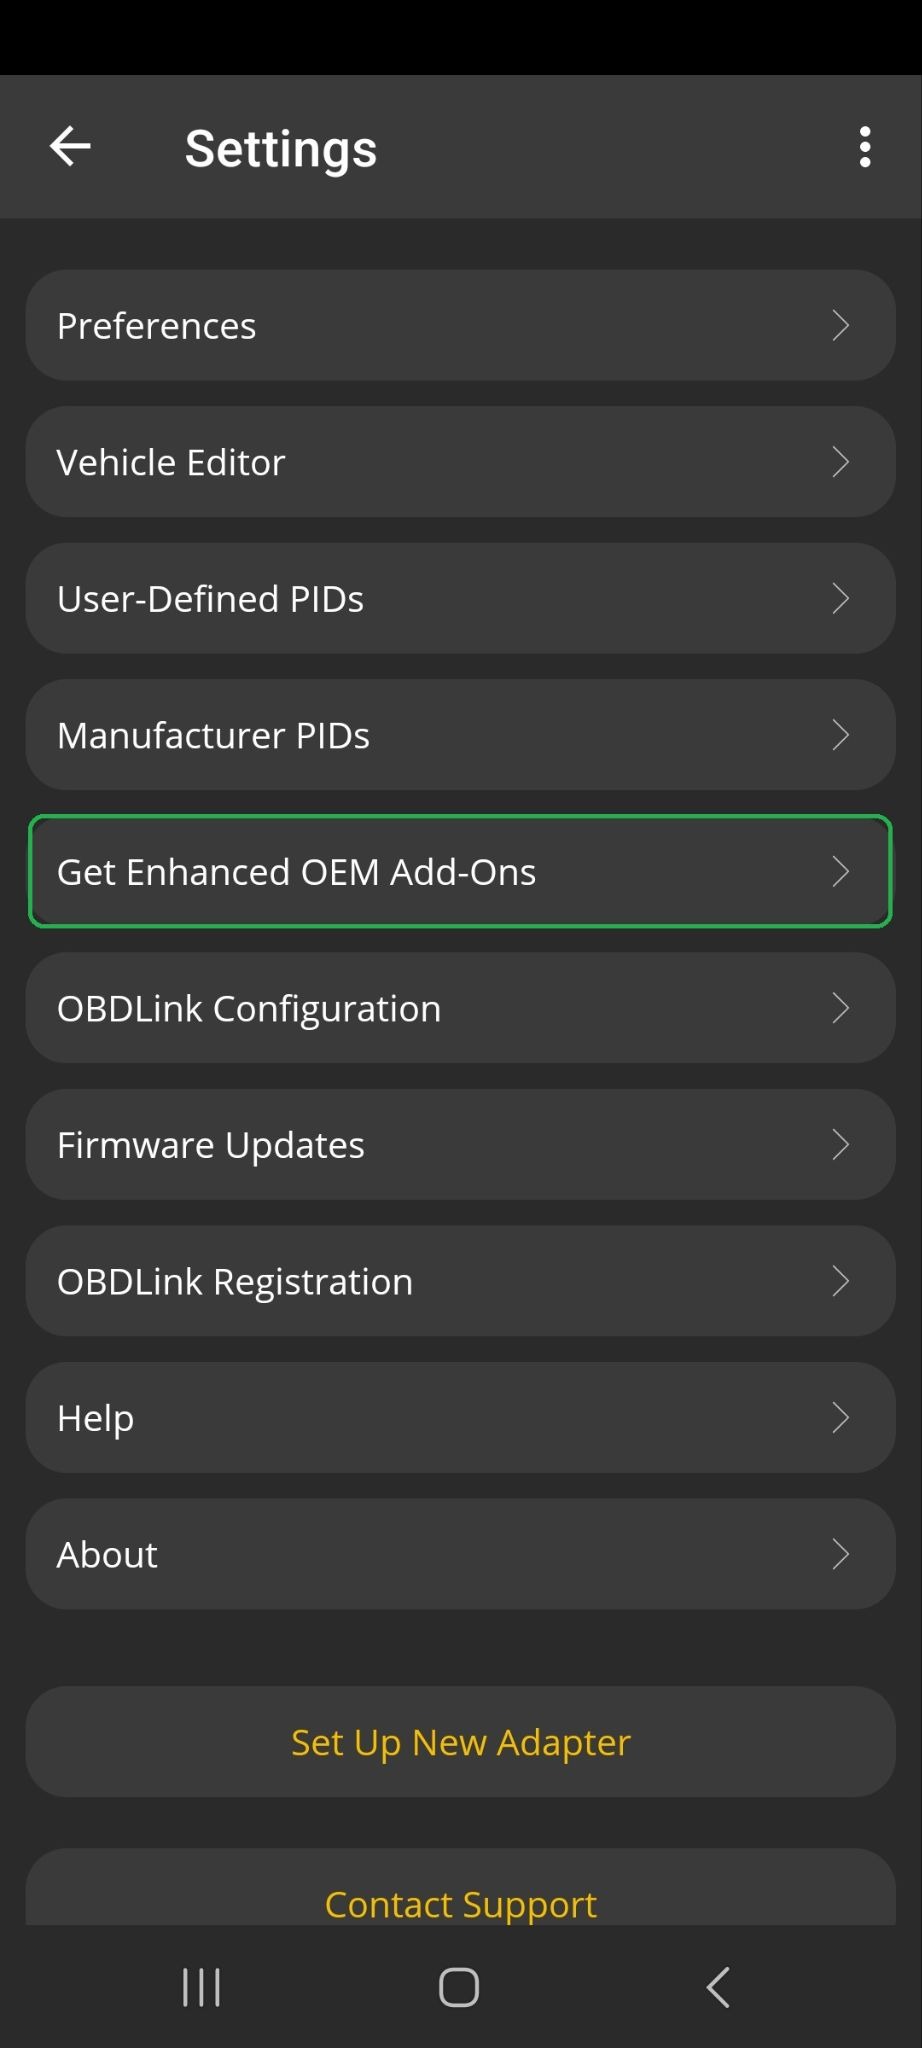
Select your vehicle OEM, select the trouble codes for your model year, and tap Get.
For our example, we selected GM and GM 2019 Enhanced Trouble Codes to install enhanced trouble codes for a 2023 Chevrolet Malibu vehicle.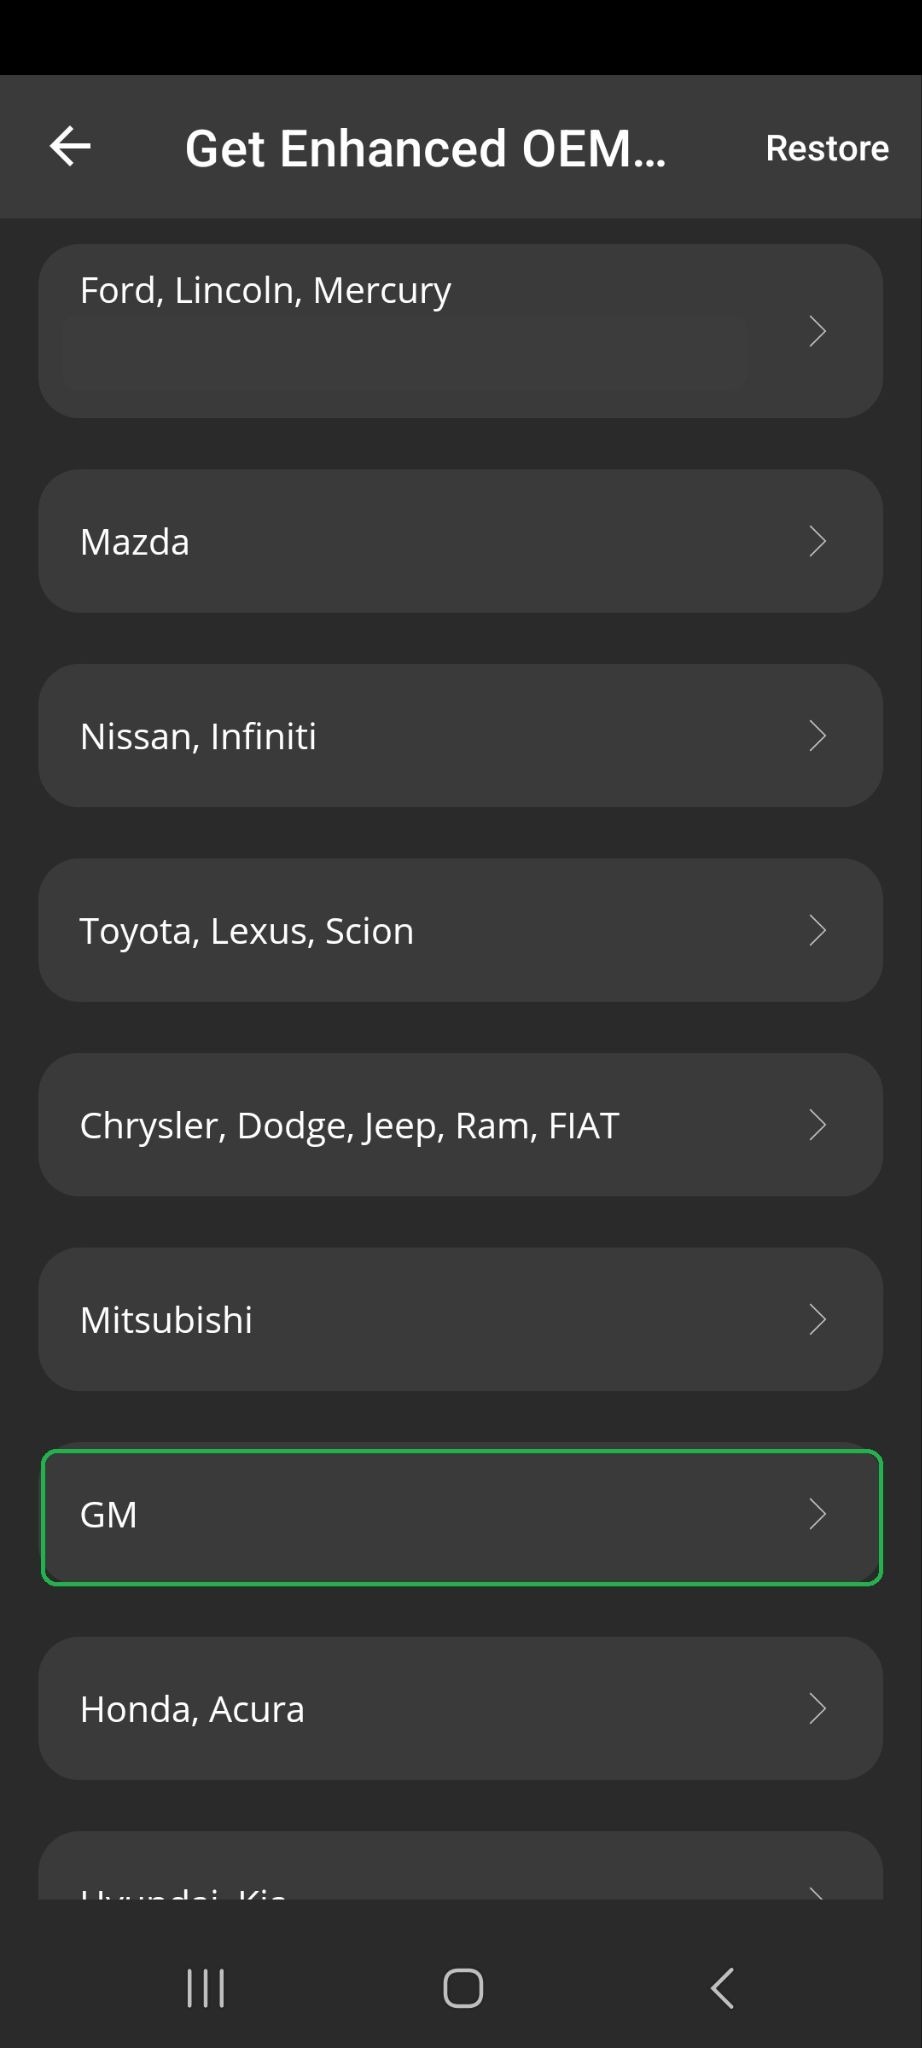
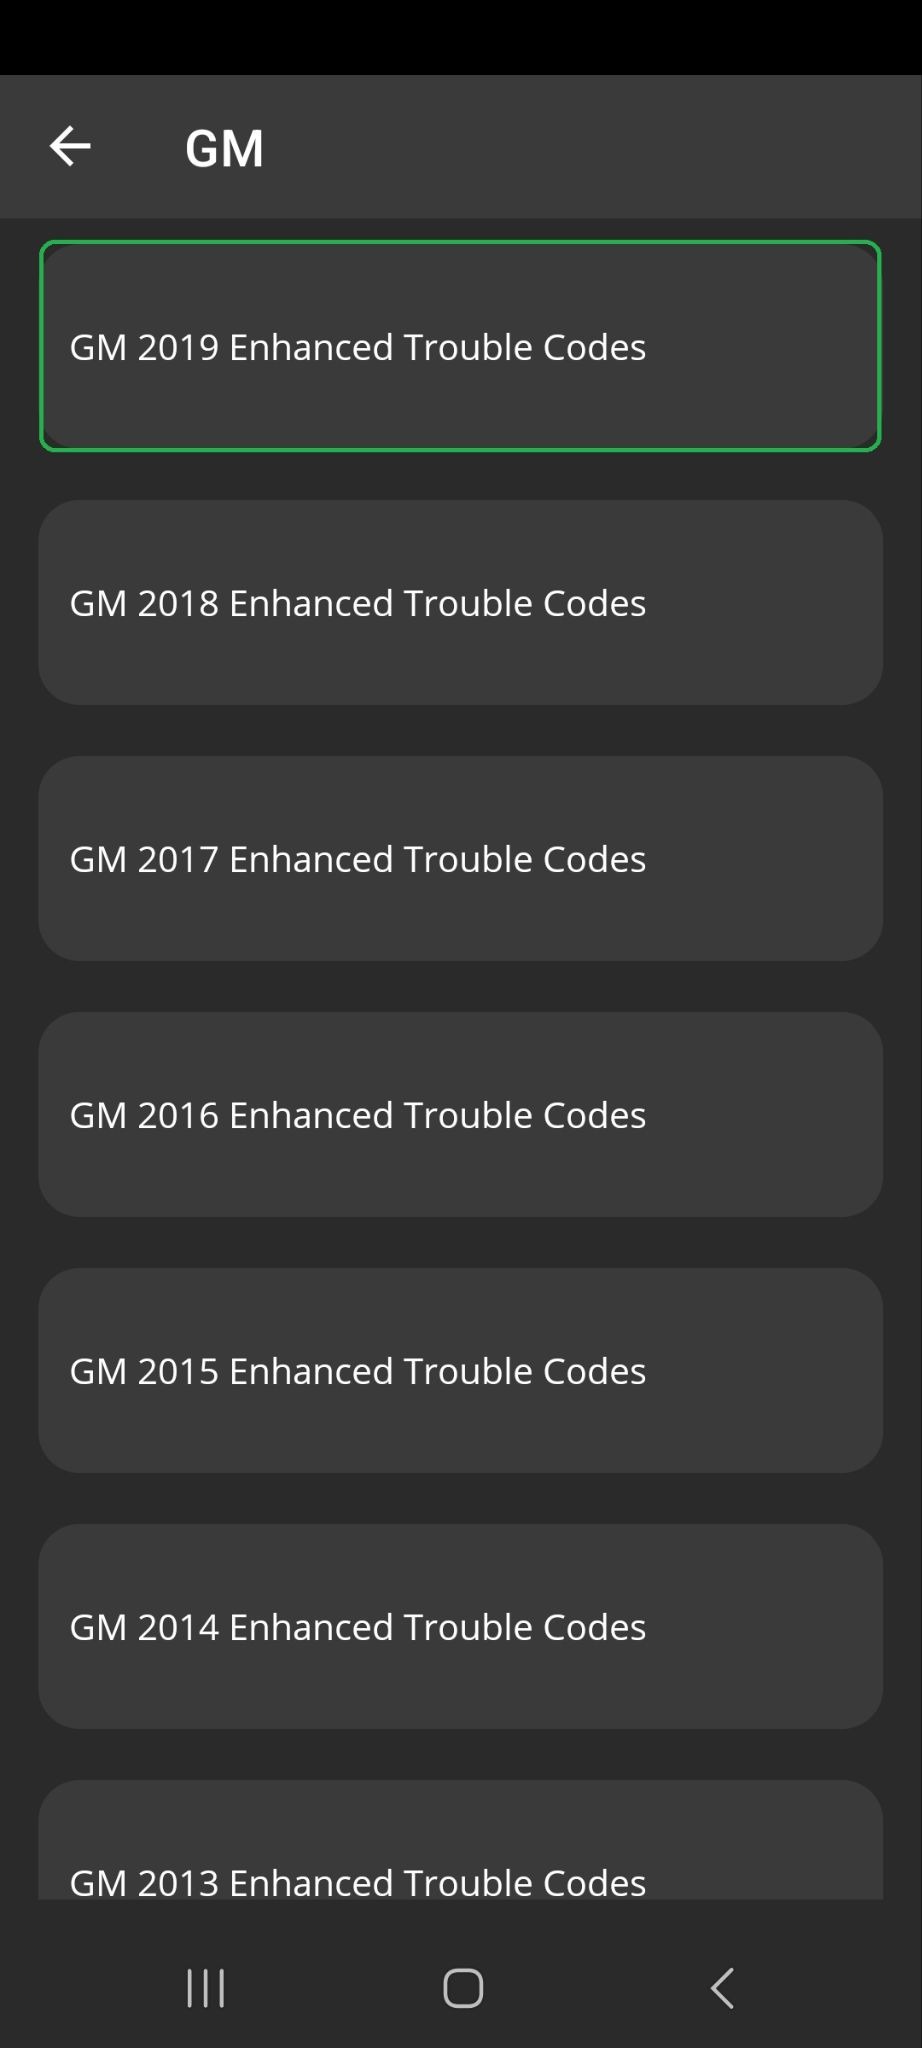
After the enhanced OEM add-ons are installed, your OBDLink adapter will be disconnected.
In the Home screen, tap Connect to connect to your OBDLink adapter.
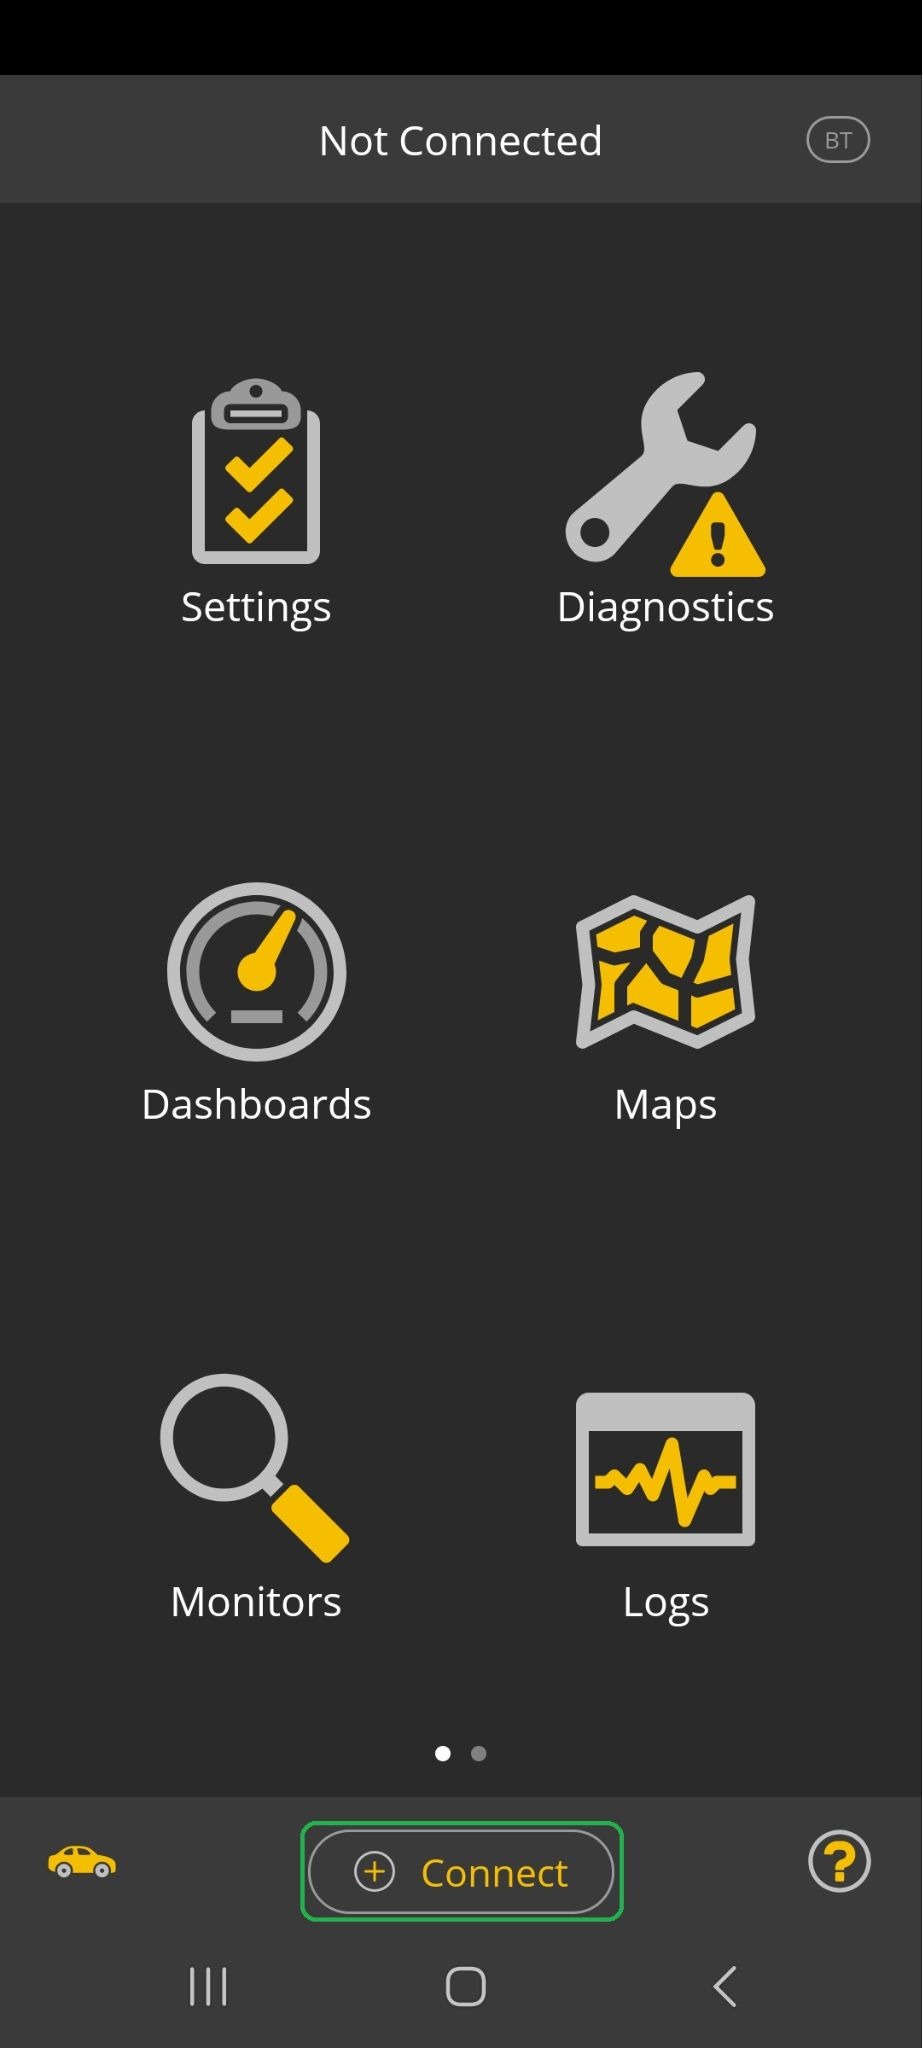
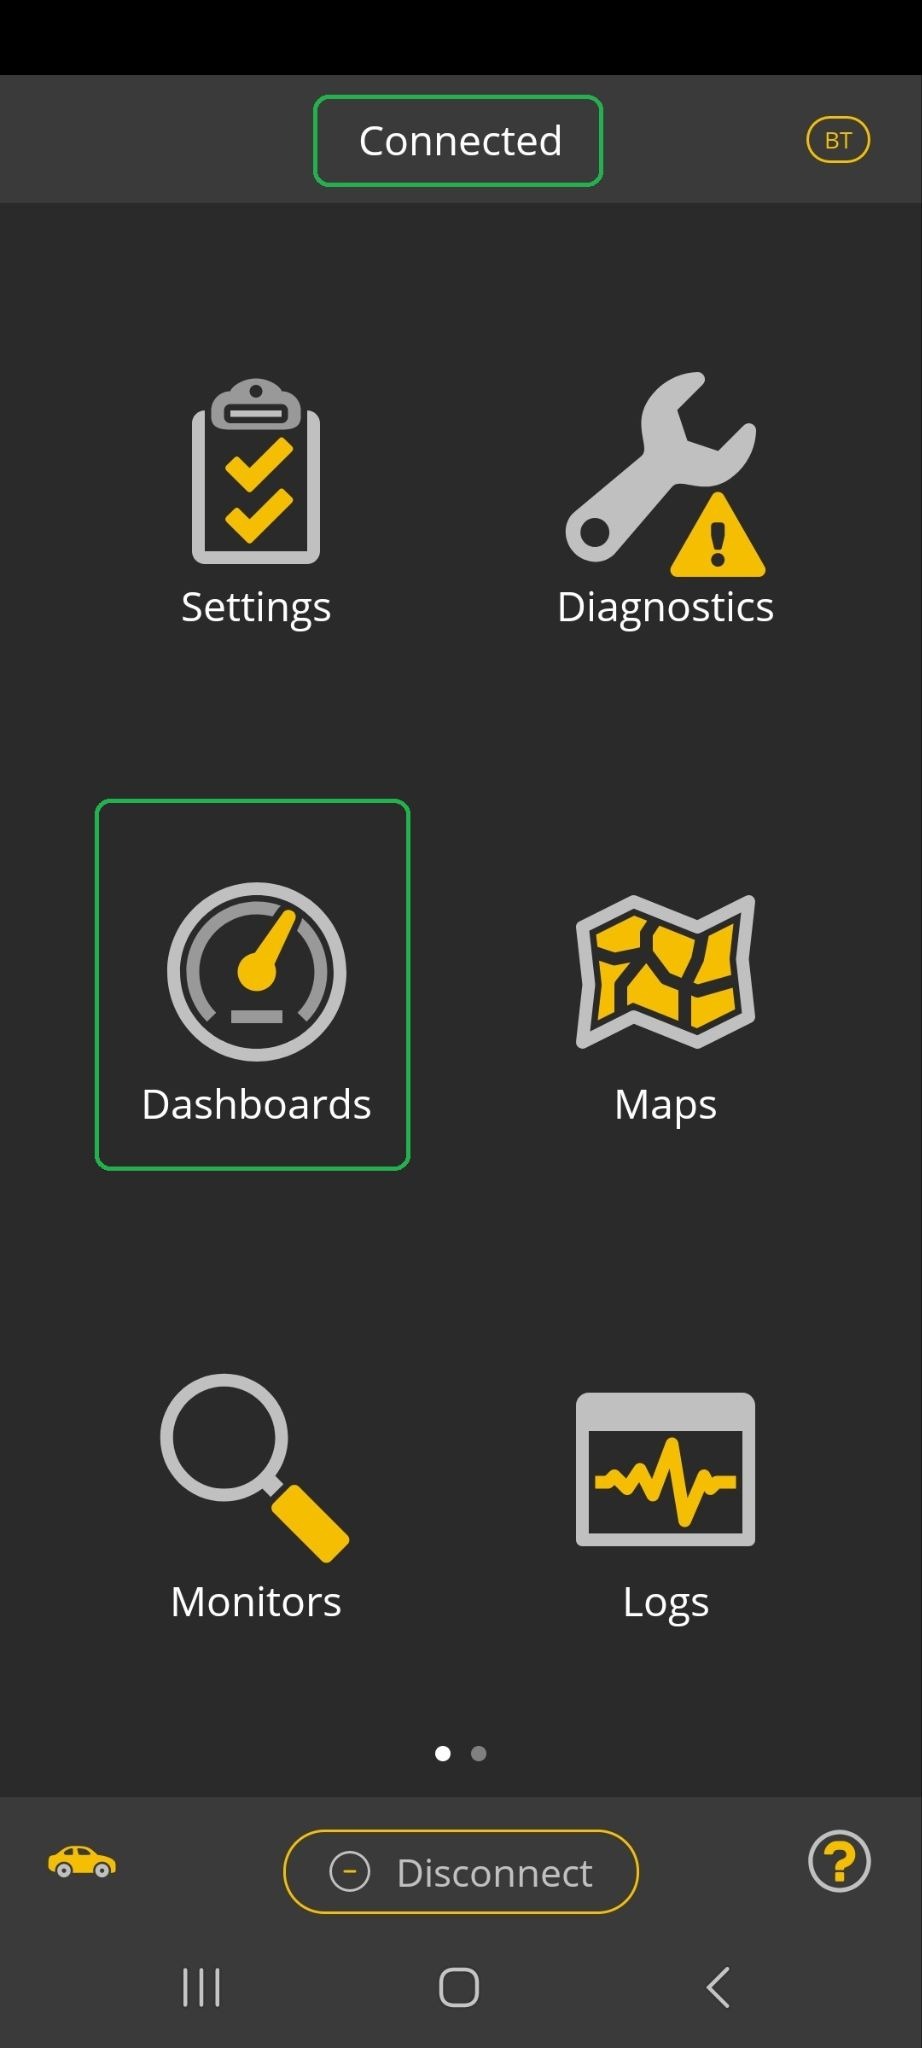
From the app's Home screen, confirm that your adapter is Connected and tap the Dashboards icon.
Tap the 3 horizontal dots (iOS) or 3 vertical dots (Android) menu button in the upper right corner.
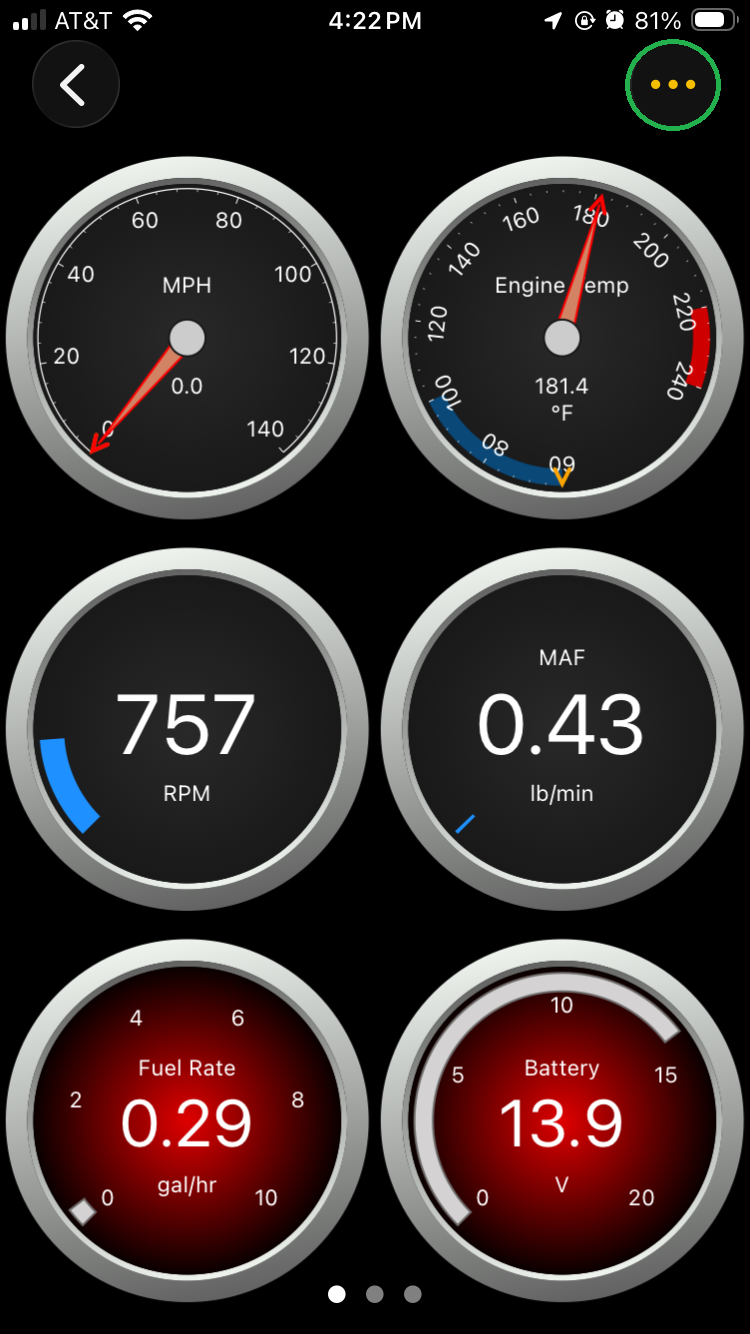
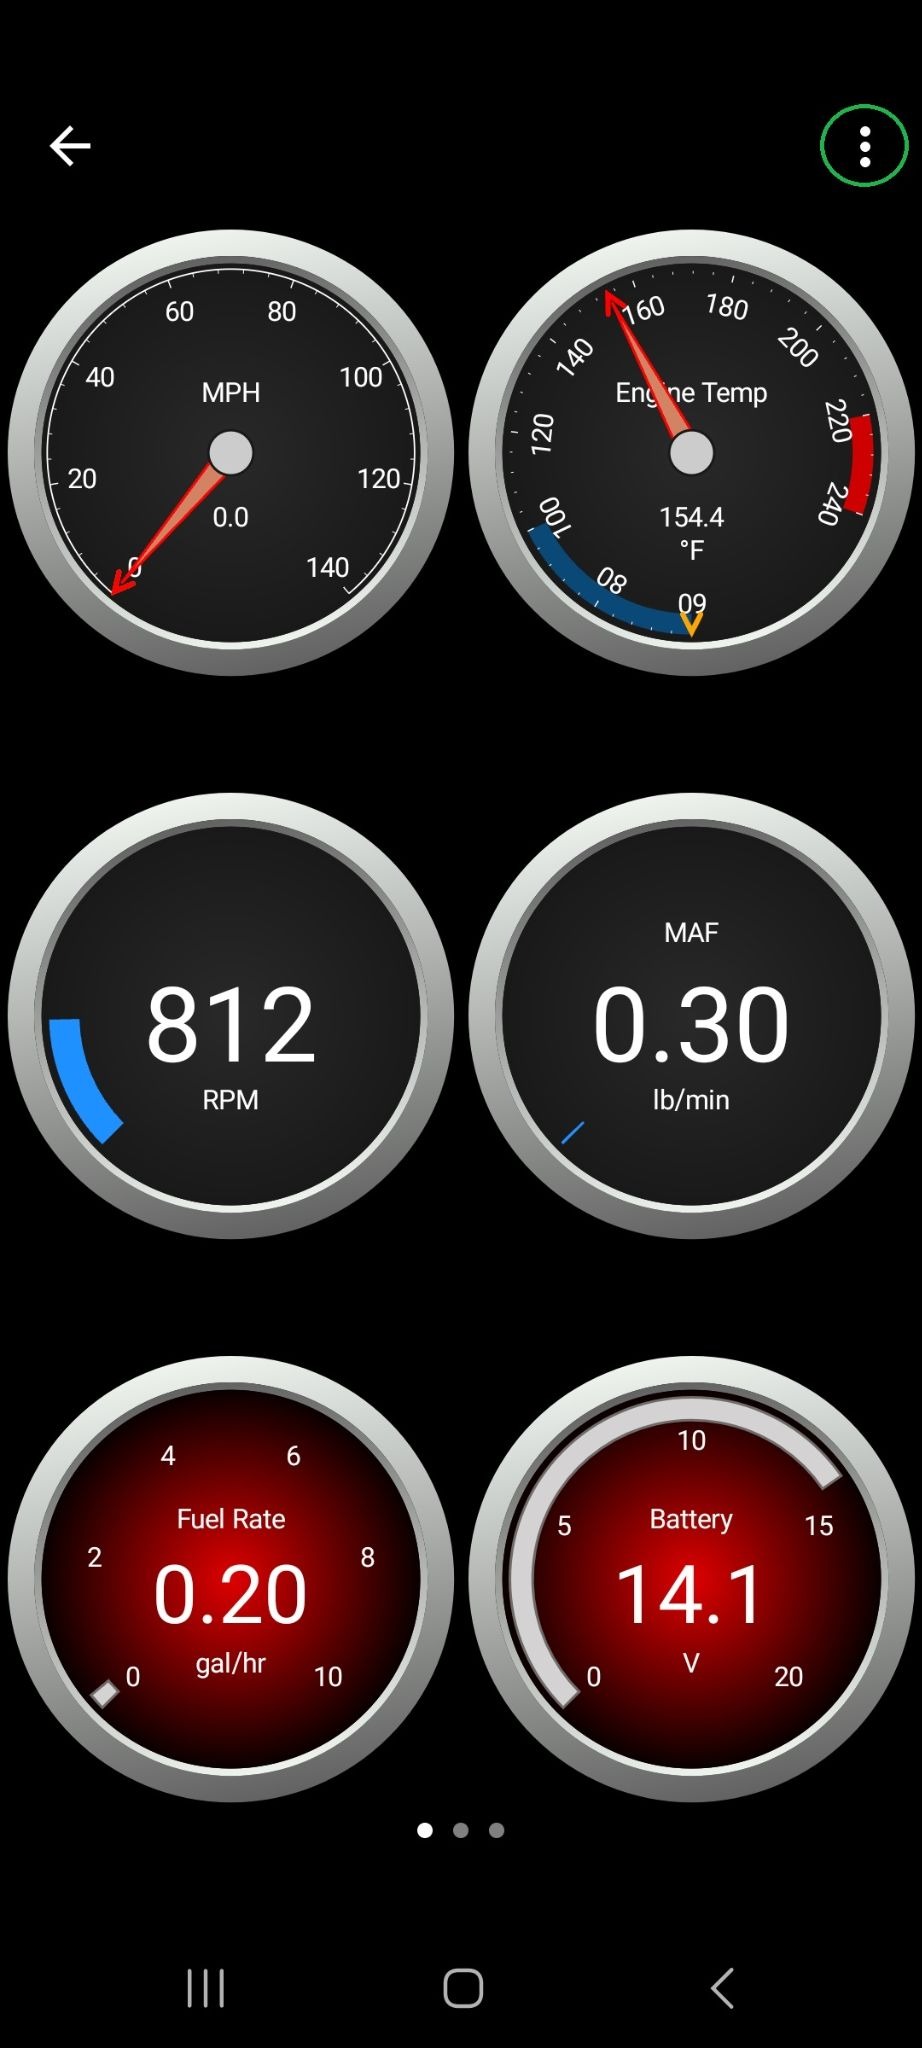
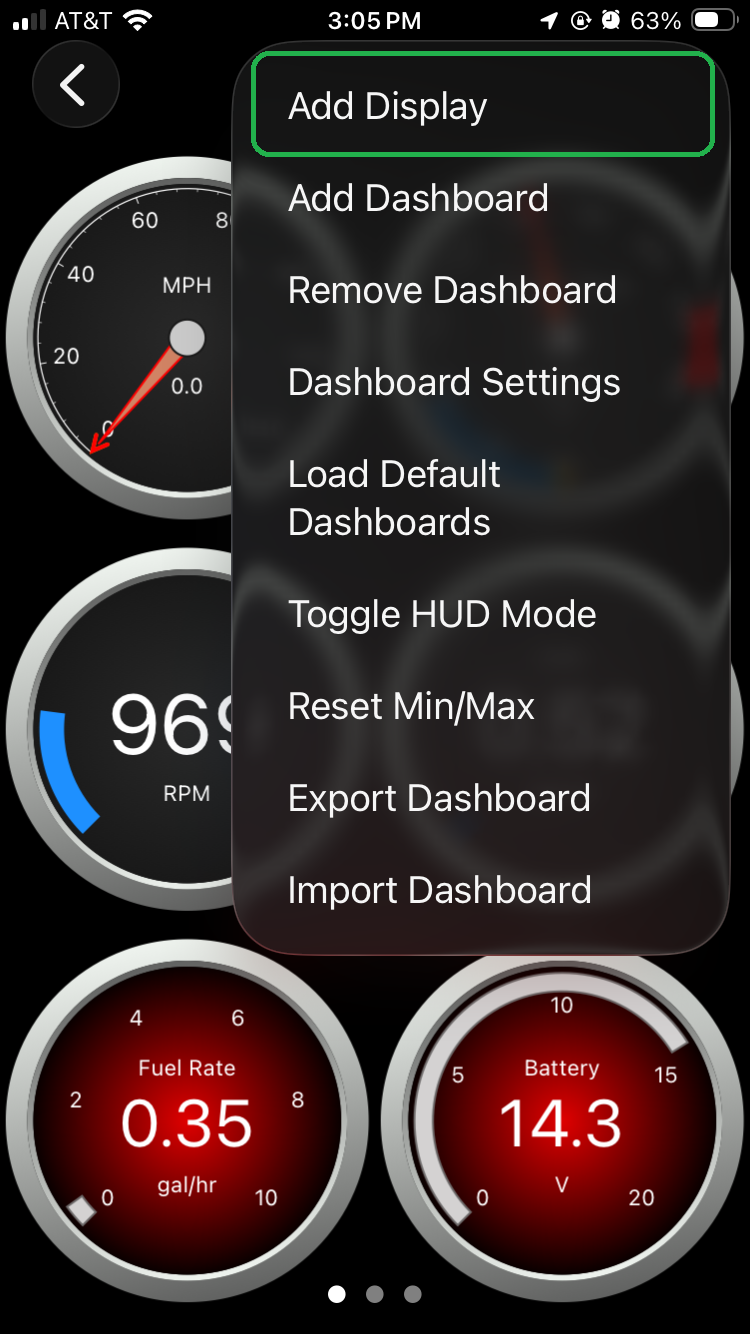
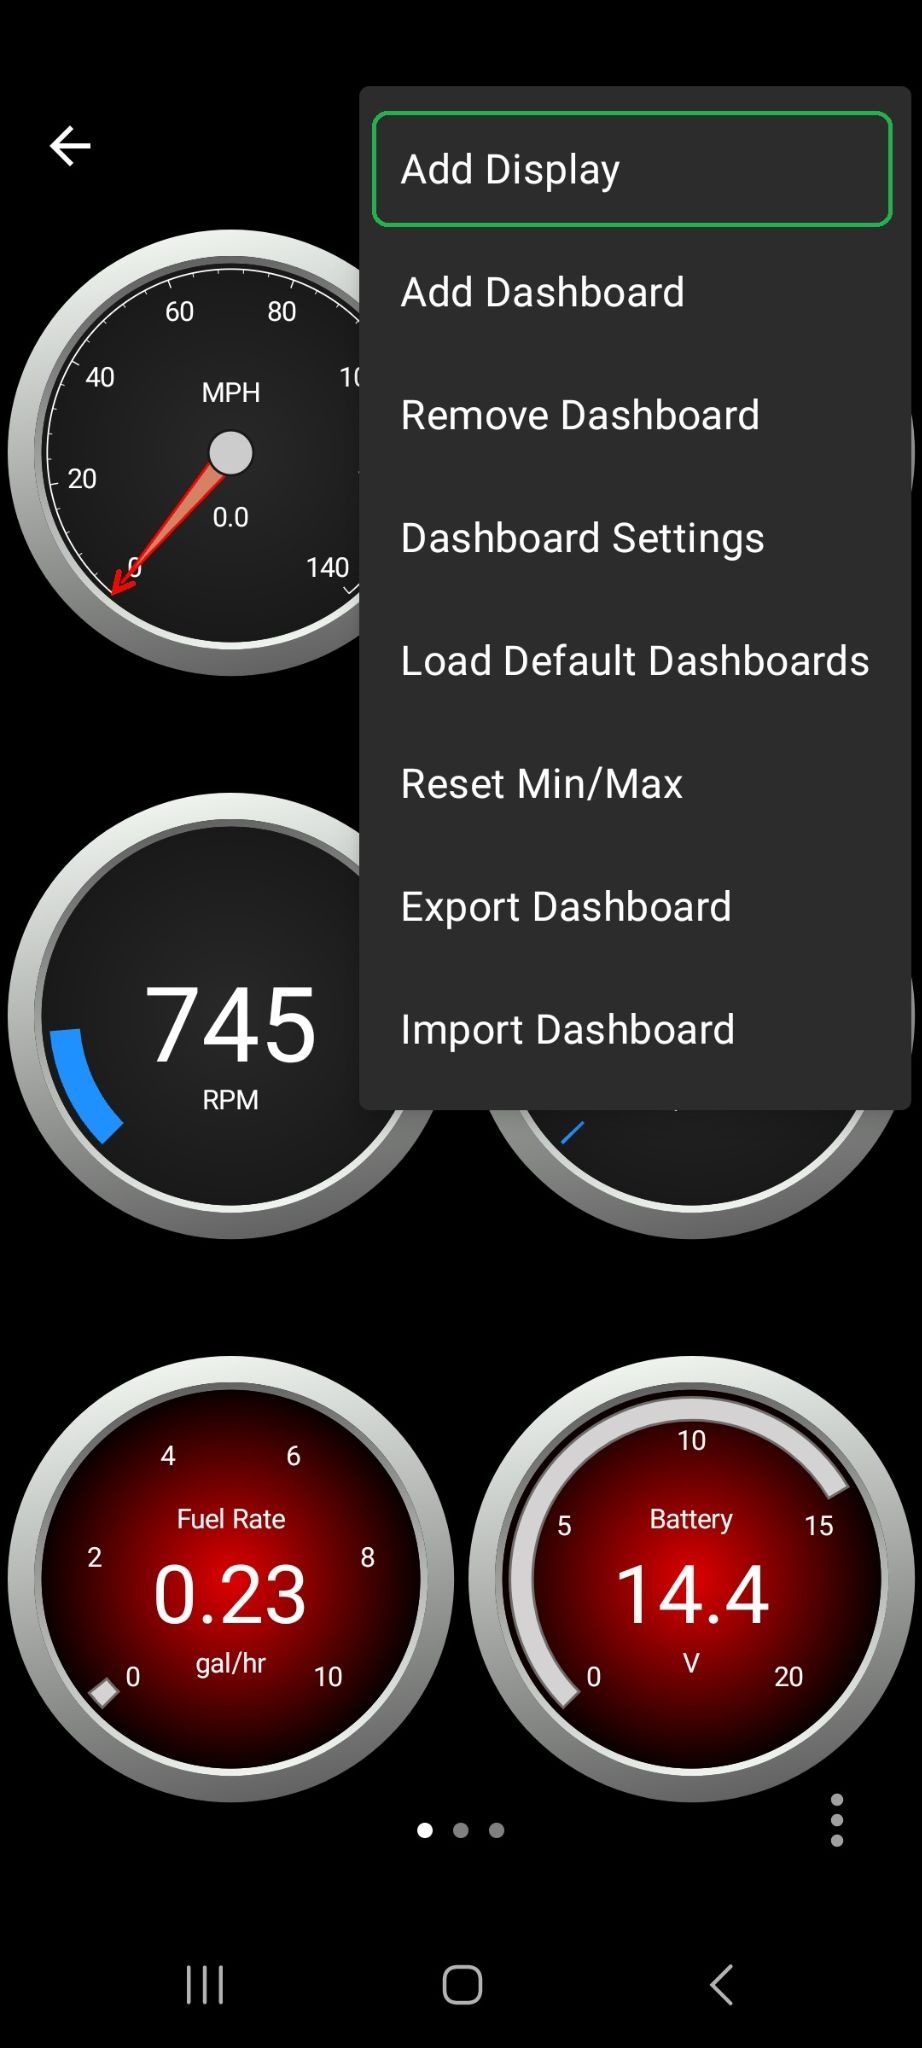
Tap Add Display to add a new gauge to the current dashboard page.
Select the gauge type on the Display Type menu, then tap the forward arrow (>) in the upper right corner.
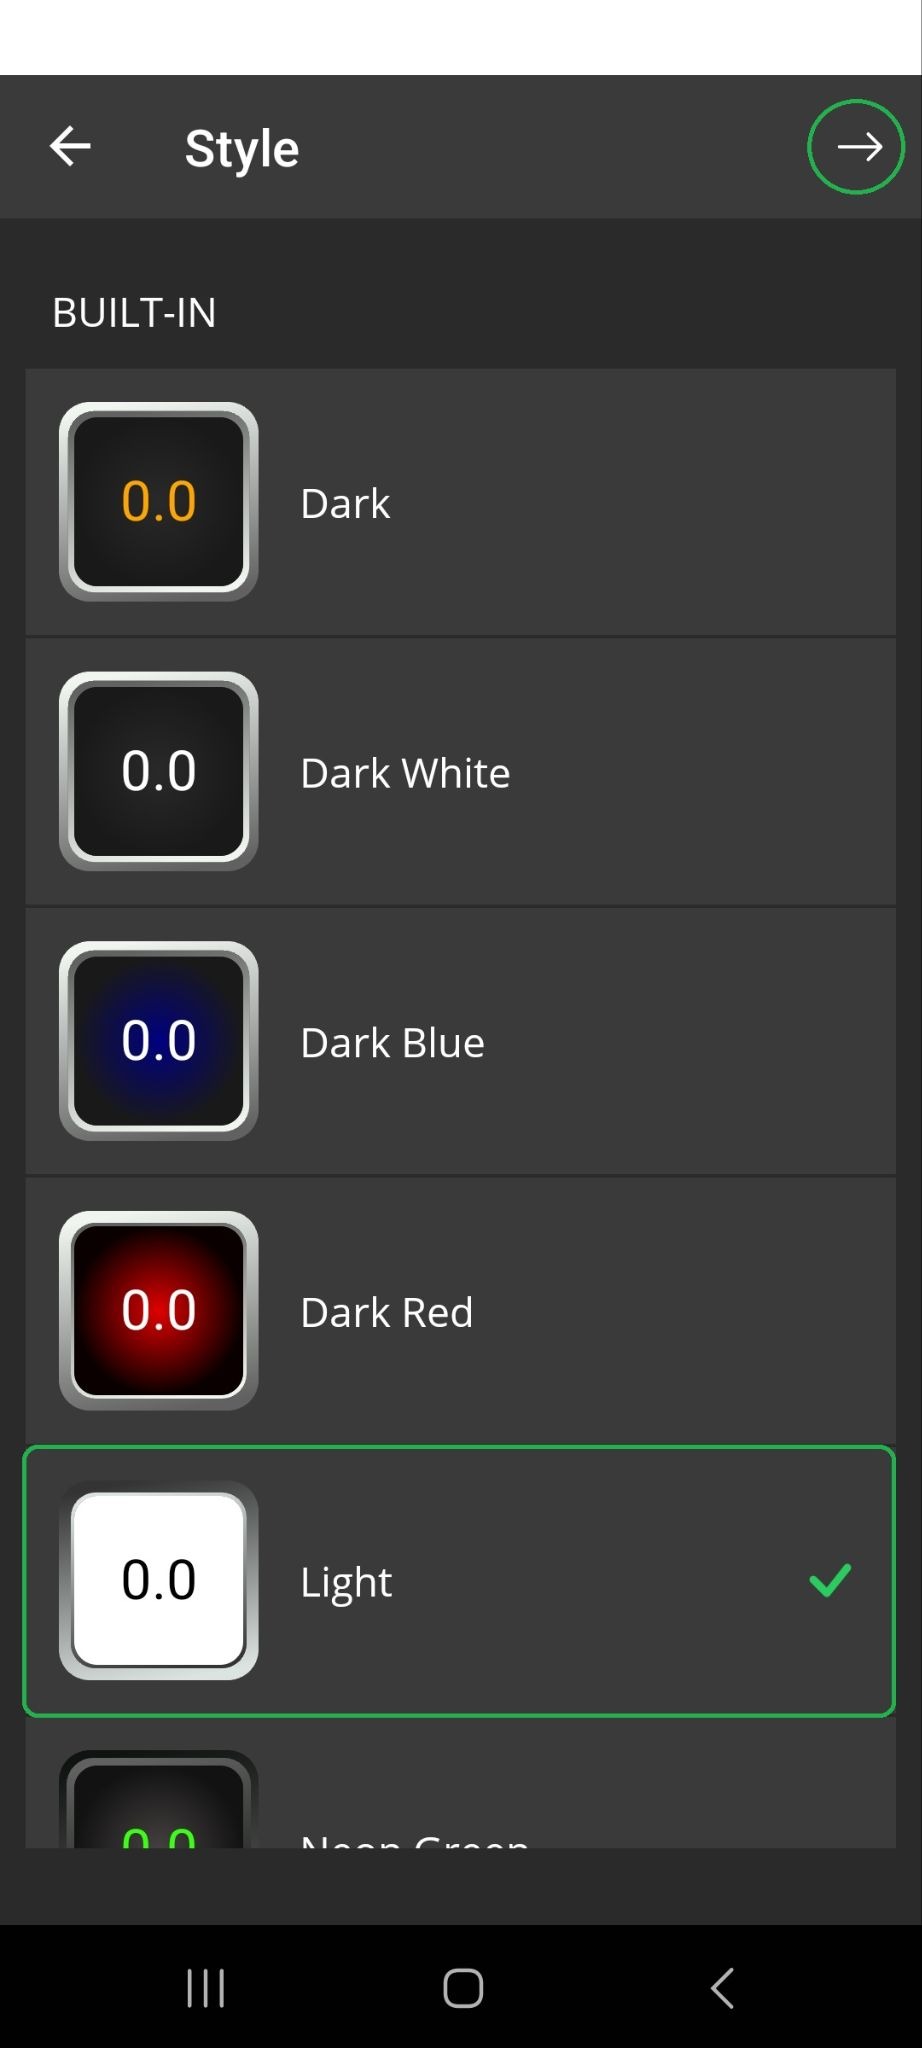
Select the gauge color on the Style menu, then tap the forward arrow (>) in the upper right corner.
In our example, we selected Digital Gauge and Light.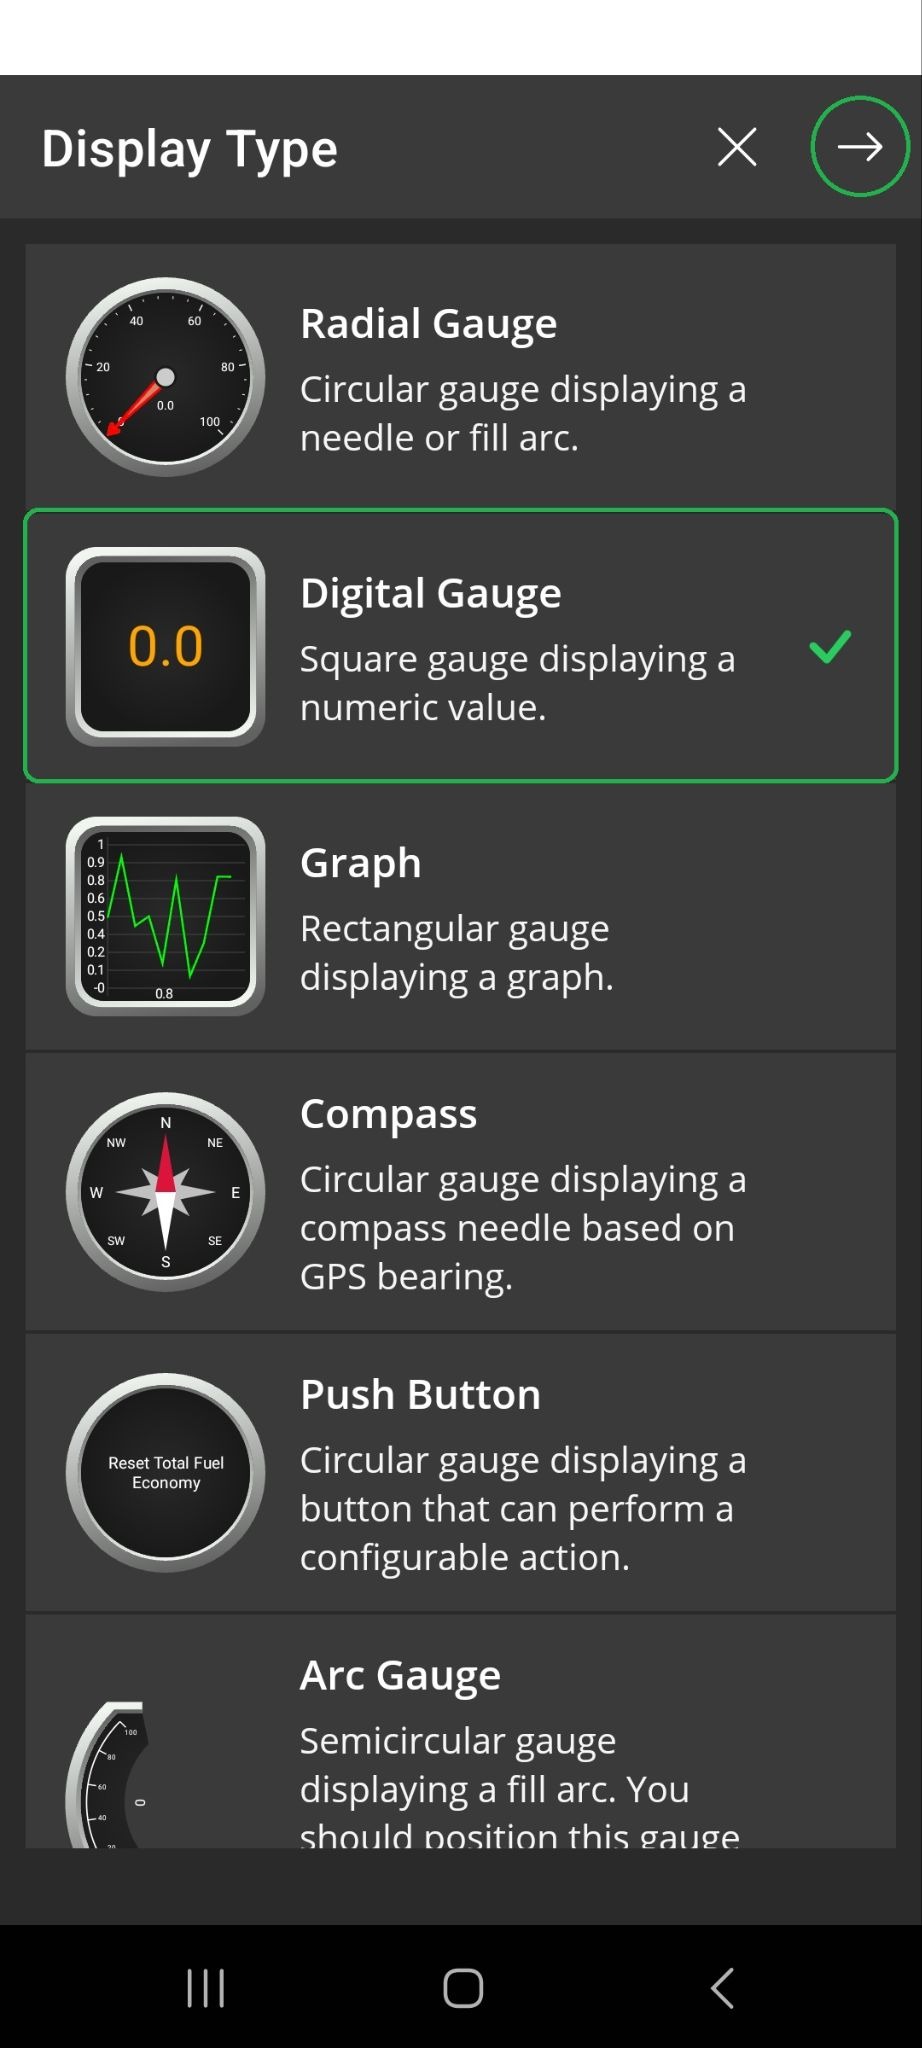
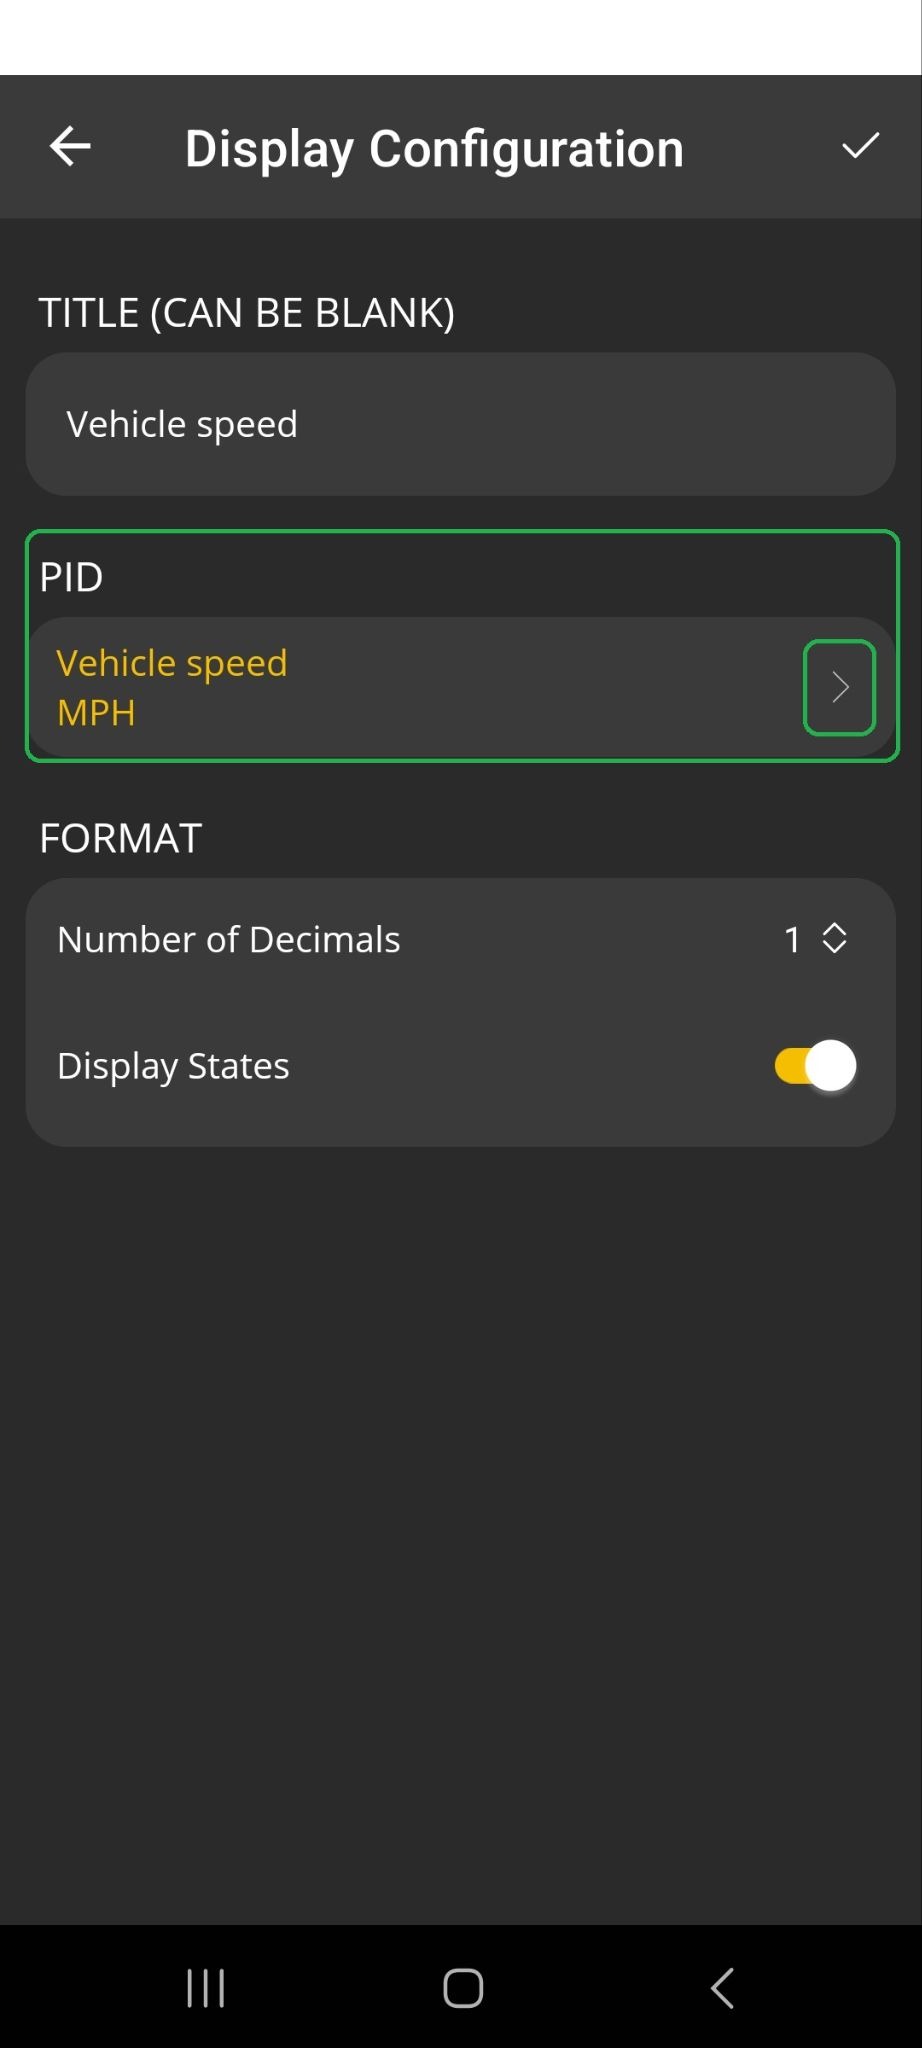
On the Display Configuration menu, tap the forward arrow in the PID section to open the Select PIDs menu.
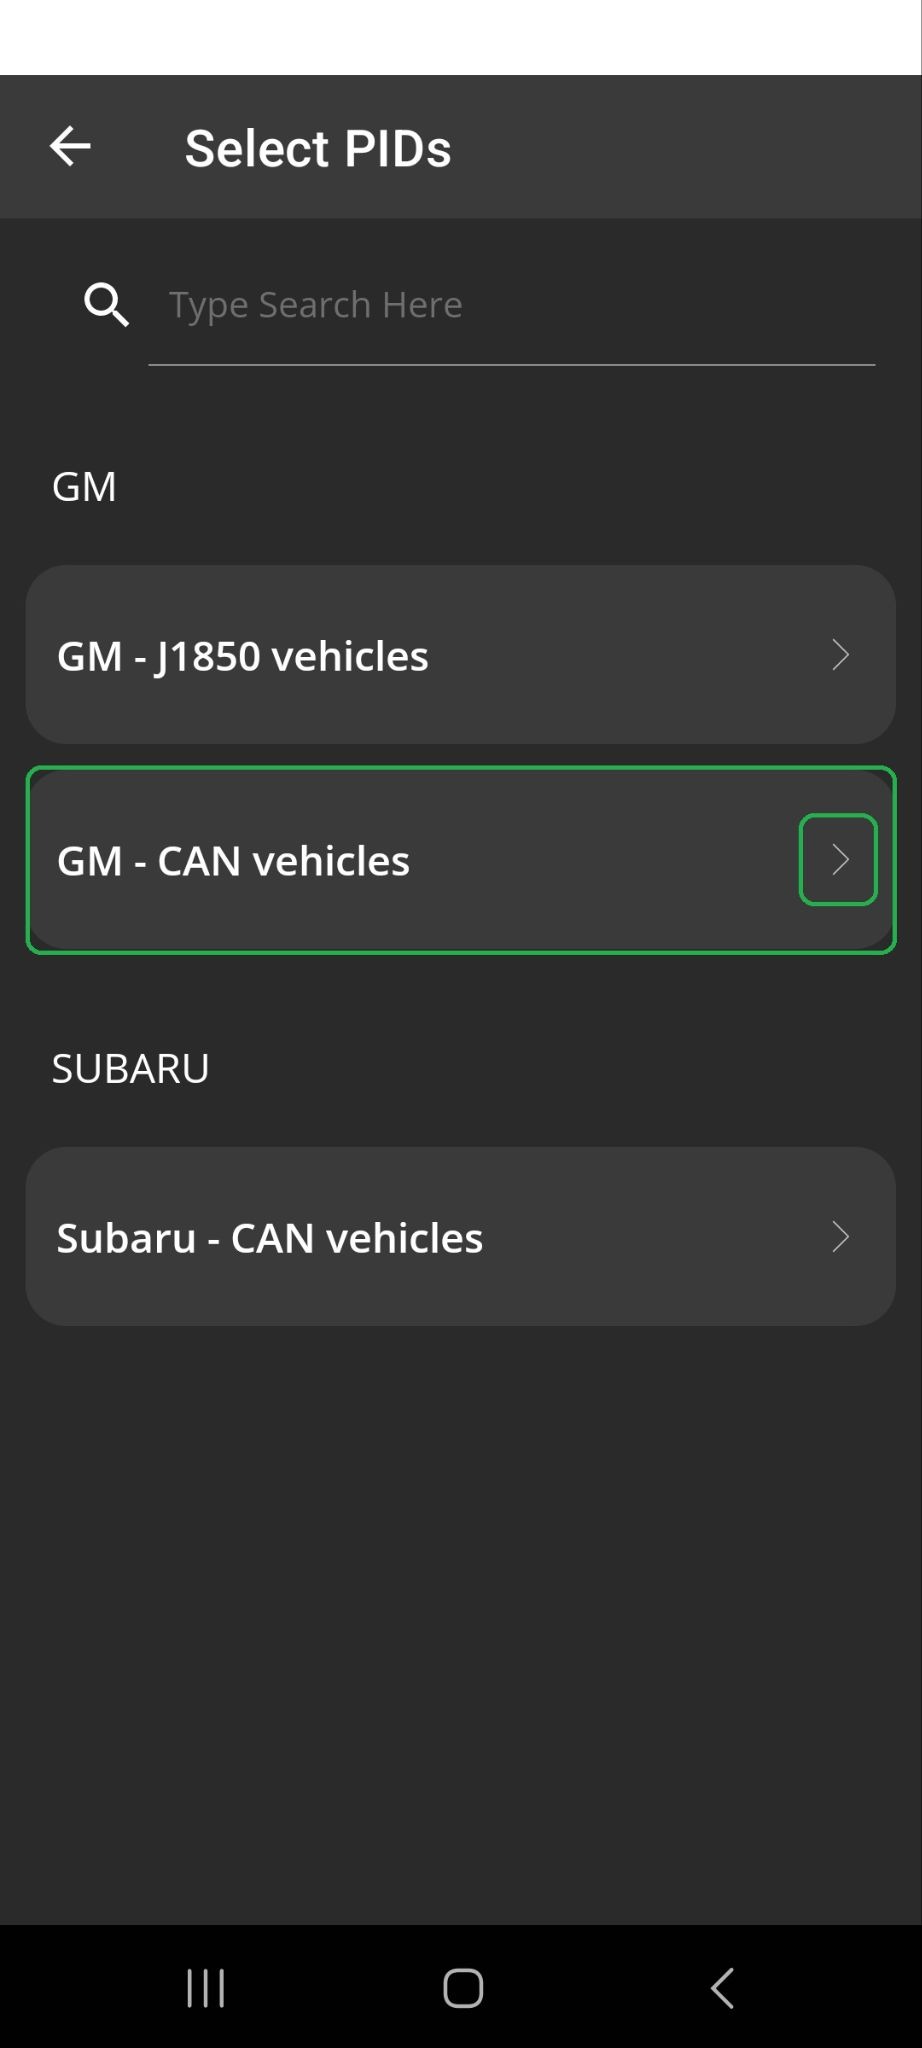
Tap Manufacturer PIDs and select GM - CAN vehicles.
Note: Vehicles that use the CAN protocol are typically from 2007 and newer. In our example, we are using a 2023 Chevrolet Malibu.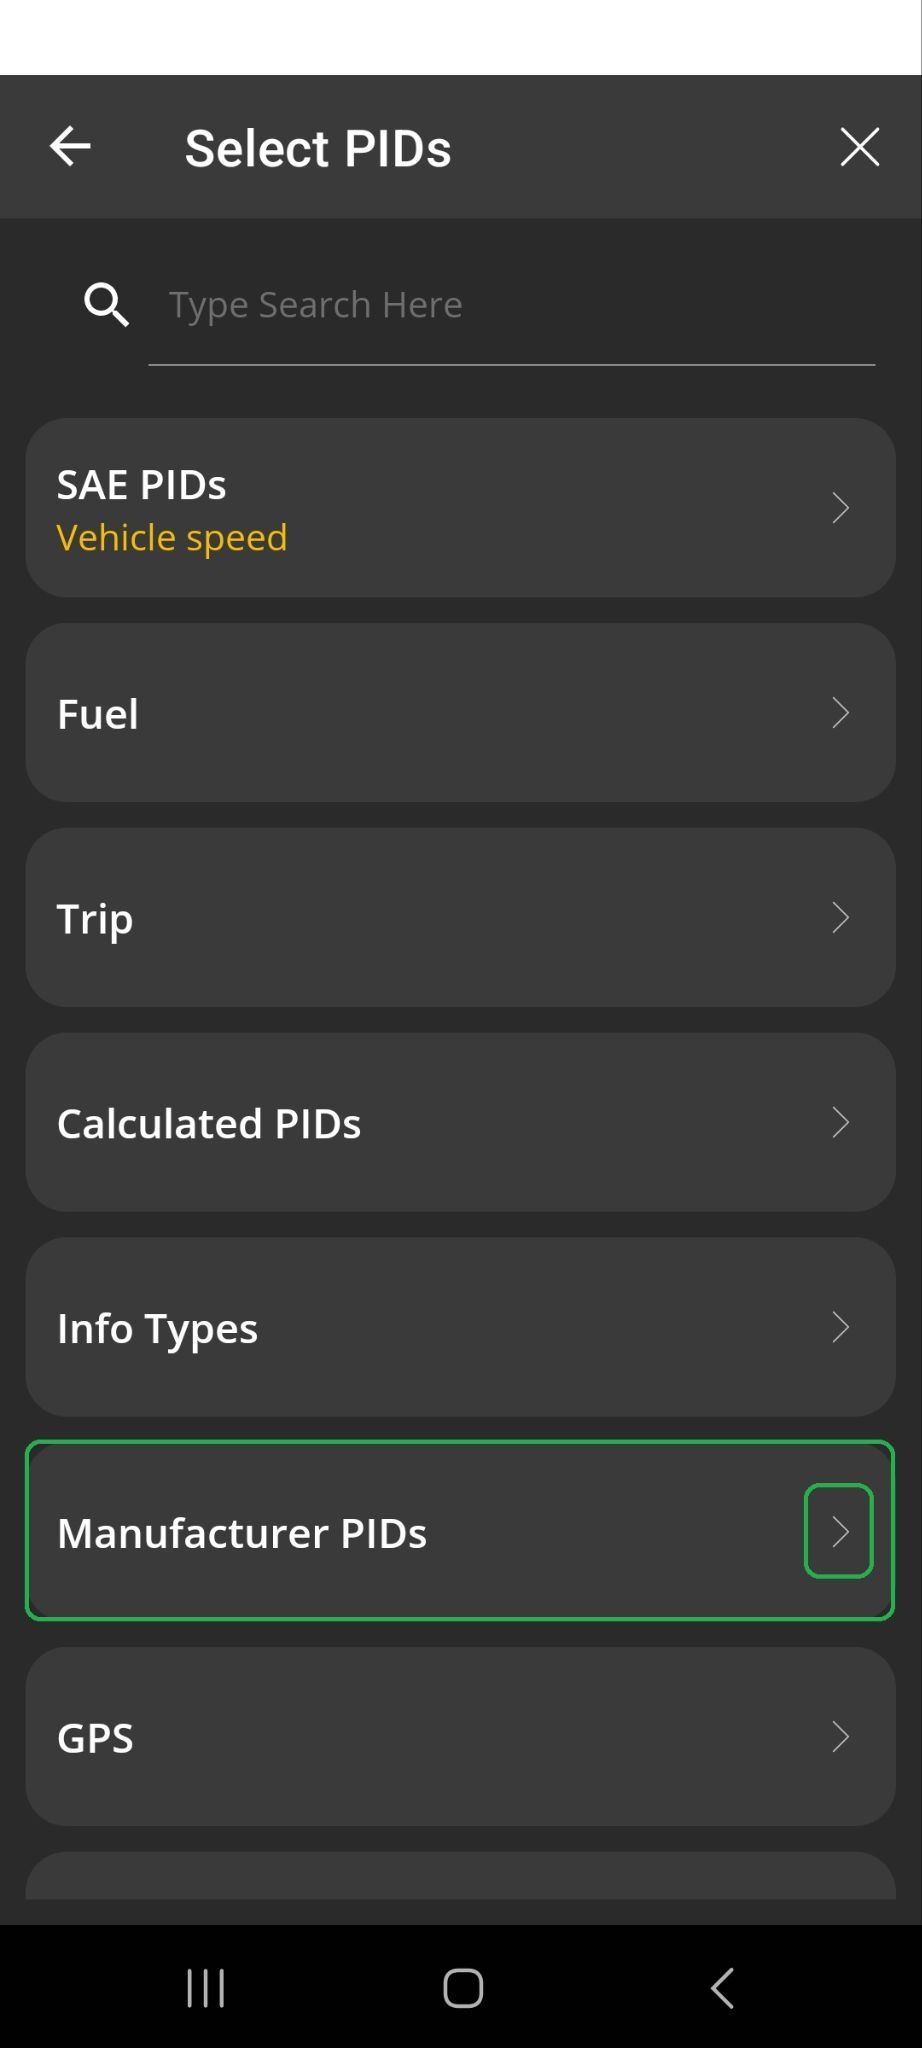
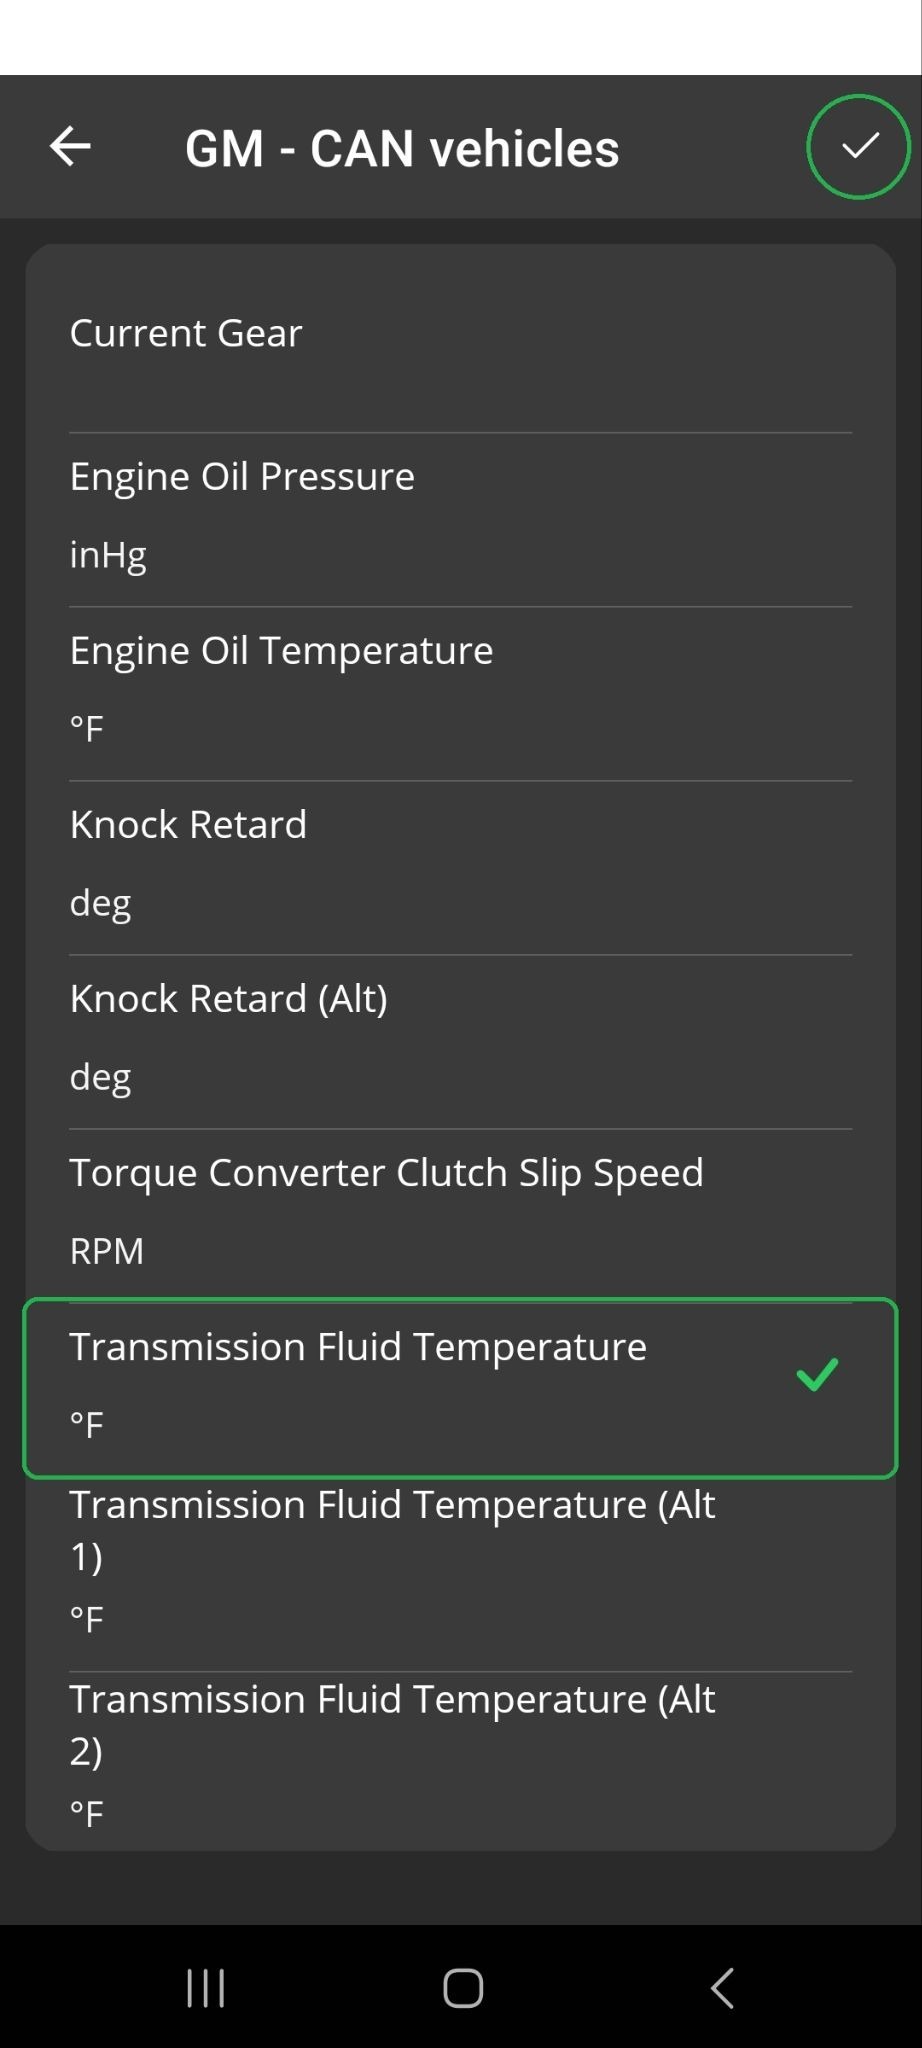
Scroll down to select Transmission Fluid Temperature (°F), and tap the checkmark (✓) in the upper right corner to save the display.
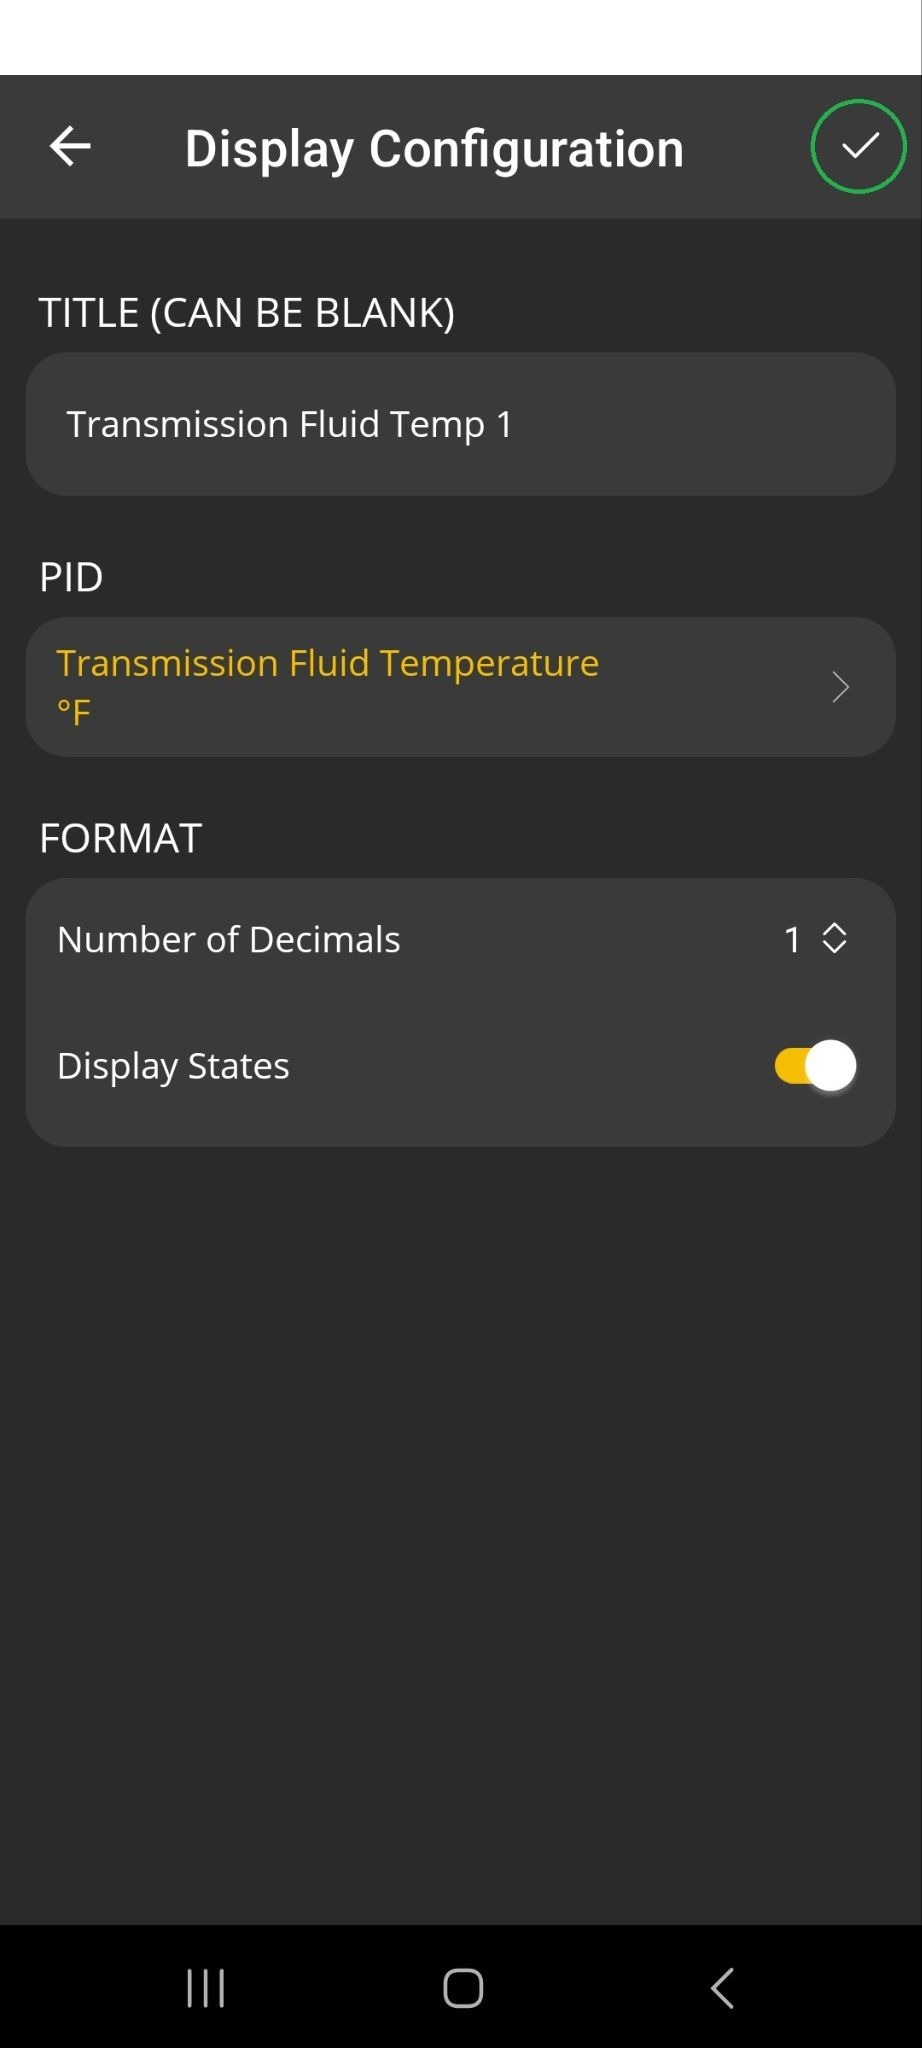
You can edit the title if you’d like, then tap the checkmark (✓) in the upper right corner to save the display.
You will see the new gauge displayed on the dashboard.
Tap and hold the gauge to open the Edit Display menu and tap Drag and Move to move the gauge on the dashboard screen.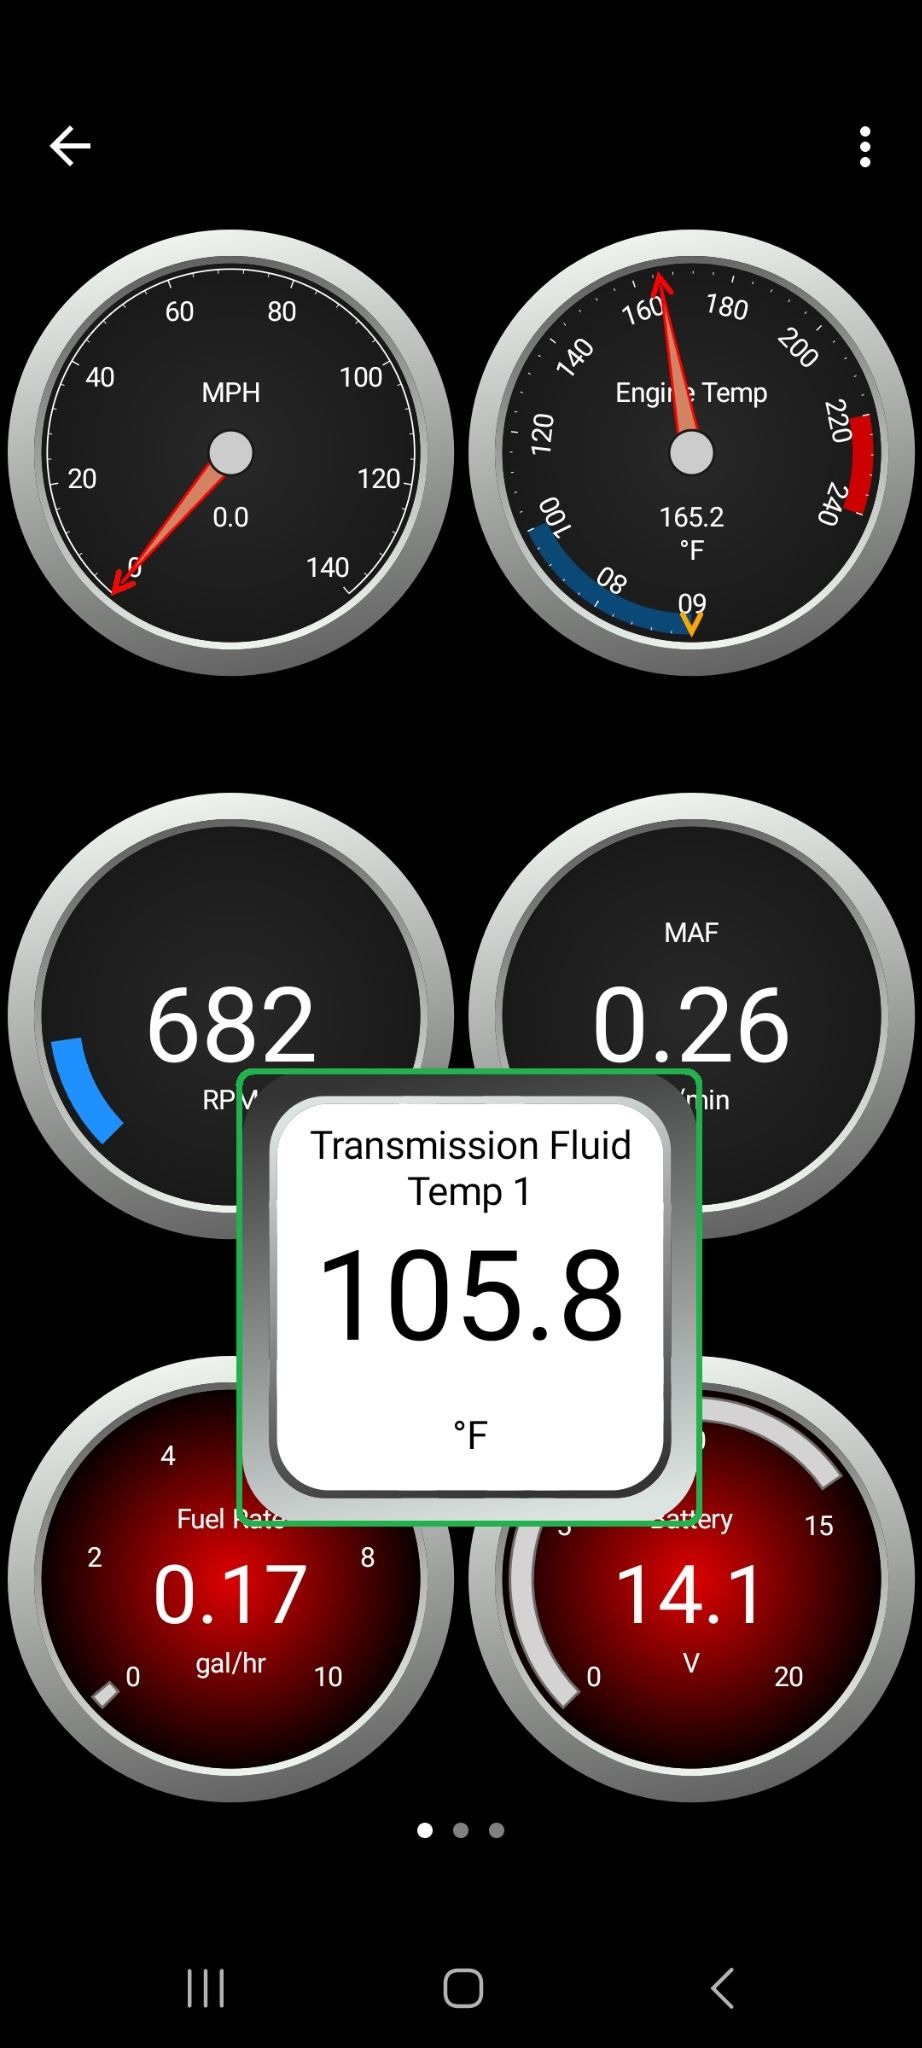
Tip: If the new gauge shows 0.0, try swiping to a different dashboard page, then swipe back. The OBDLink app may load values in the new gauge when it refreshes the page.
For more help, see the Troubleshooting section.
Troubleshooting
- If a gauge shows no data
- If you can't select a common OEM PID to display
- If you can’t find a specific OEM PID
If a gauge shows no data
Here are some things to try:
- If a new gauge shows 0.0 when you first create it, try swiping to a different dashboard page, then swipe back. The OBDLink app may load values in the new gauge when it refreshes the page.
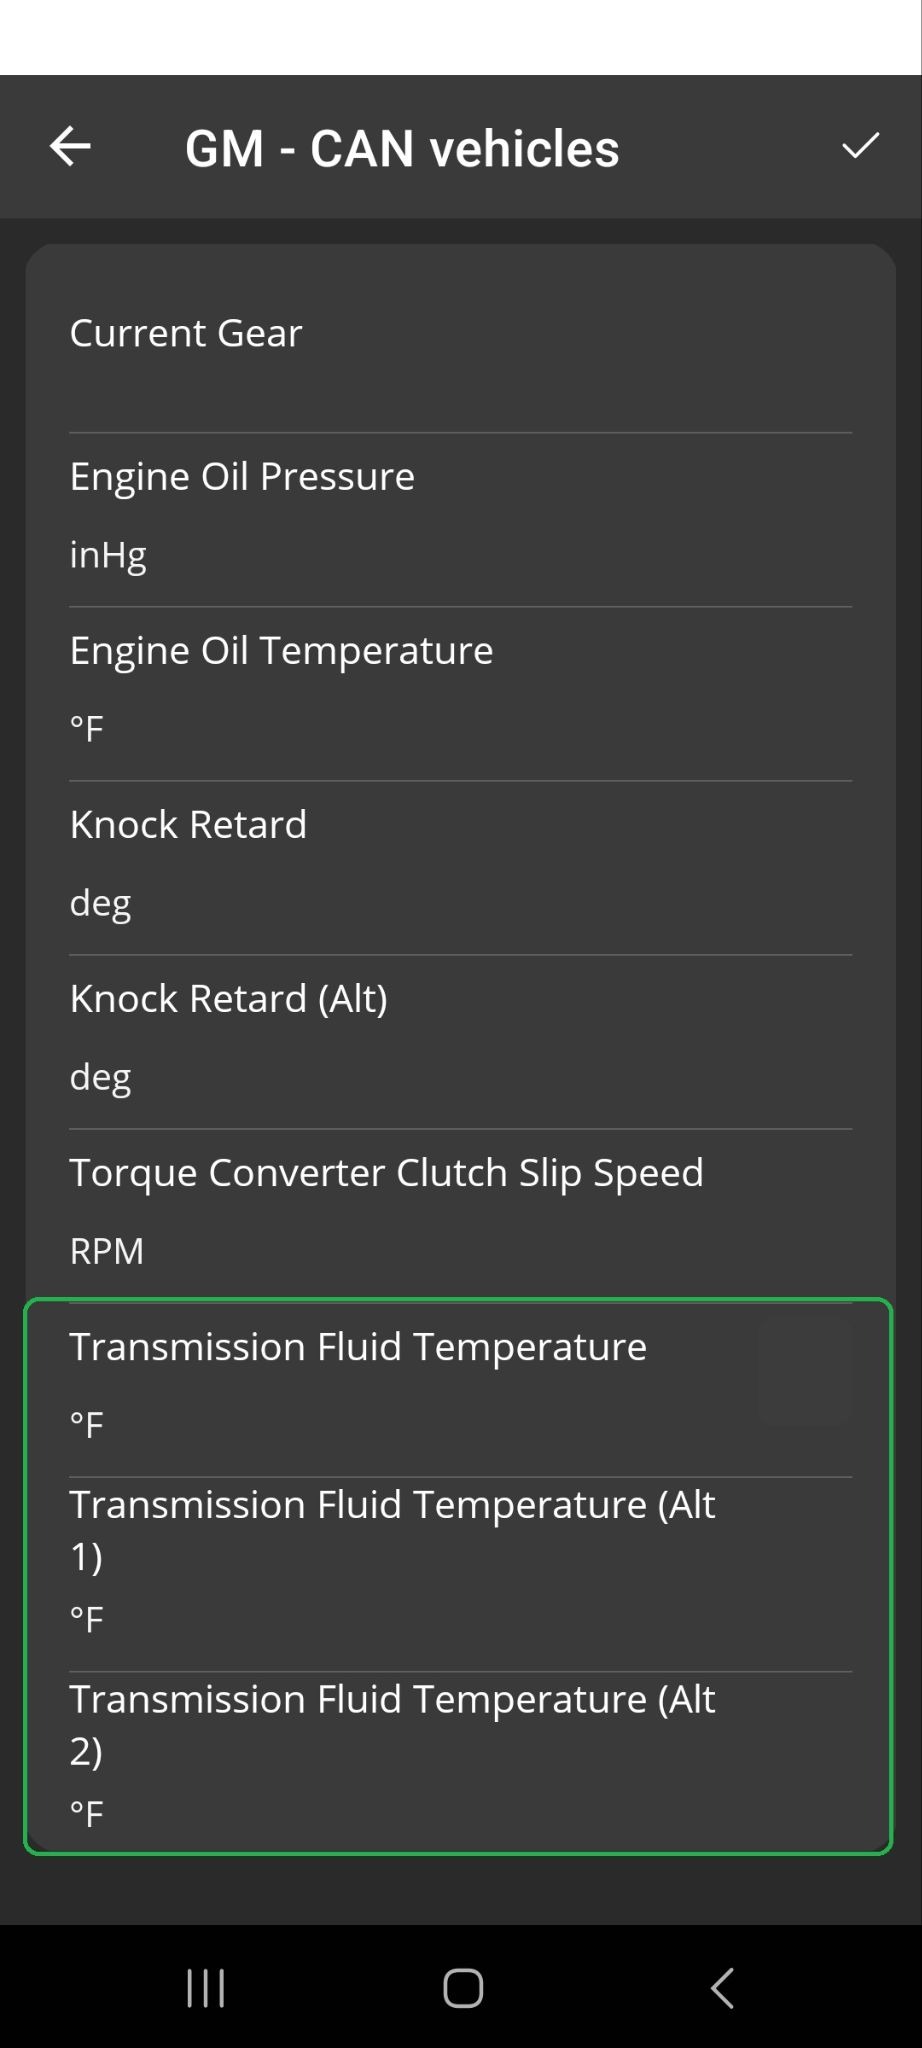
- If the PID selection list shows several different options for transmission temperature, edit the gauge to select a different PID from the list. For example, the screenshot below shows 3 different PIDs (highlighted) for Transmission temperature in the GM - CAN vehicle PID list. Select one of the alternate PIDs in step 3f and see if the OBDLink app shows data.
If you can't select a common OEM PID to display
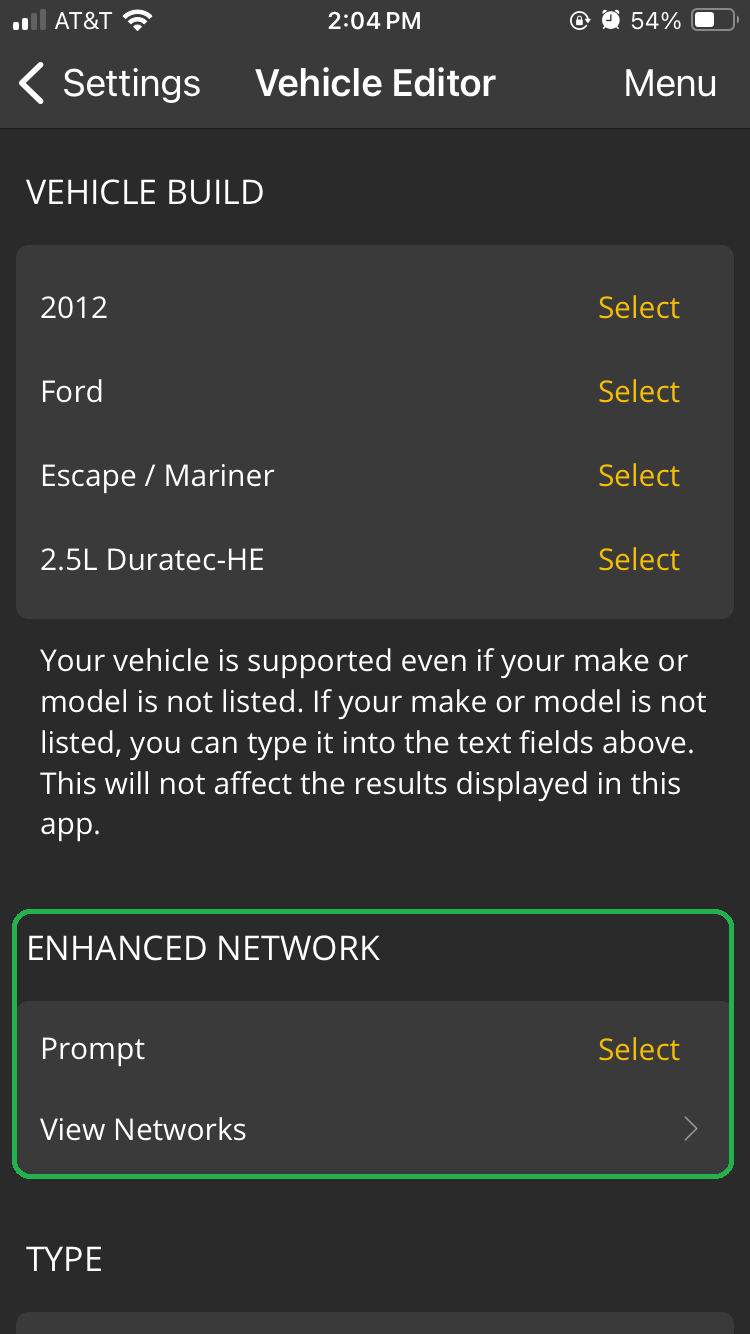
When you install Enhanced OEM Add-Ons, you may also see a dialog asking to select a vehicle diagnostic network.
The default option for Enhanced Network is Prompt, which allows you to choose a diagnostic network each time you connect to your vehicle. The Generic OBD2 network option will provide access to many PIDs, but some PIDs are only available on a specific network.
For example, if you have a Toyota vehicle and you want to view Tire Pressure Monitor PIDs, you must select the Tire Pressure Monitor network. If you selected Generic OBD2 or Network A, you will not be able to access Tire Pressure Monitor PIDs.
To connect to a different diagnostic network, navigate to Settings > Vehicle Editor > Enhanced Network > Tap Select.
To change the current option, tap the network you want and tap OK.
If you can’t find a specific OEM PID
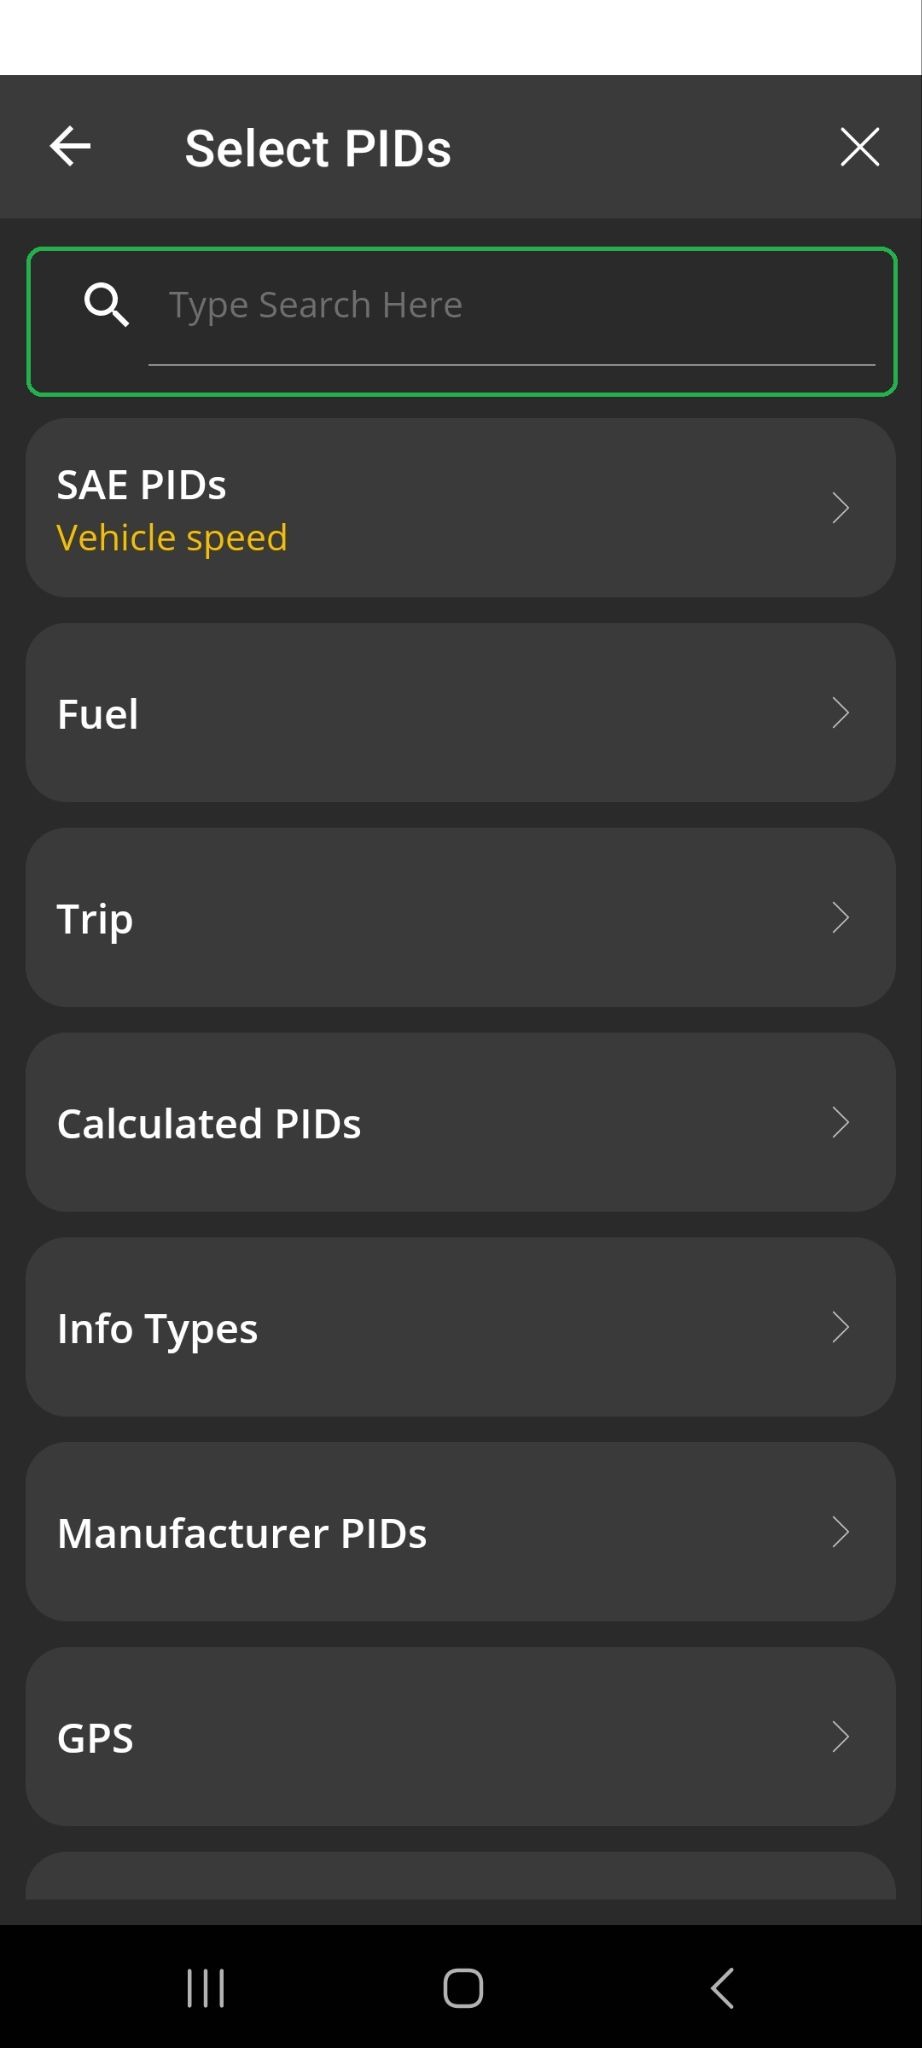
- In the Select PIDs menu, enter text in the search field (highlighted) and the OBDLink app displays categories containing PIDs that match your search text.
- If you can’t find the OEM PID you want, try searching a forum for your vehicle and see if other users have posted tips or recommendations.
- In the OBDLink app, tap Settings > Help > Settings > User-Defined PIDs to read more about this advanced feature.
OEM PID reference
If your vehicle’s make is in the list below, we recommend that you check the free add-on that comes with OBDLink MX+ for the following vehicle manufacturers: FCA, Ford, Mazda, Toyota, Nissan, Mitsubishi. The free add-on lets you use certain built-in PIDs in the OBDLink app.
If you have a GM or Subaru vehicle, you can access Manufacturer PIDs for additional built-in PIDs.
Both of these methods follow the same process described in the examples in this article.
If your vehicle’s make is not one of the free add-ons and not listed in the Manufacturer PIDs section, you can try some of the options listed below. We can’t include the complete details for every OEM-defined PID, however, this section contains a few transmission temperature PIDs that have worked for OBDLink customers. You can also try searching a forum for your vehicle and see if other users have posted tips or recommendations.
Follow these steps to add a new PID:
- Start your vehicle.
- On your phone/tablet, open the OBDLink app and connect to your OBDLink adapter.
- Confirm that your phone/tablet is Connected to the OBDLink adapter.
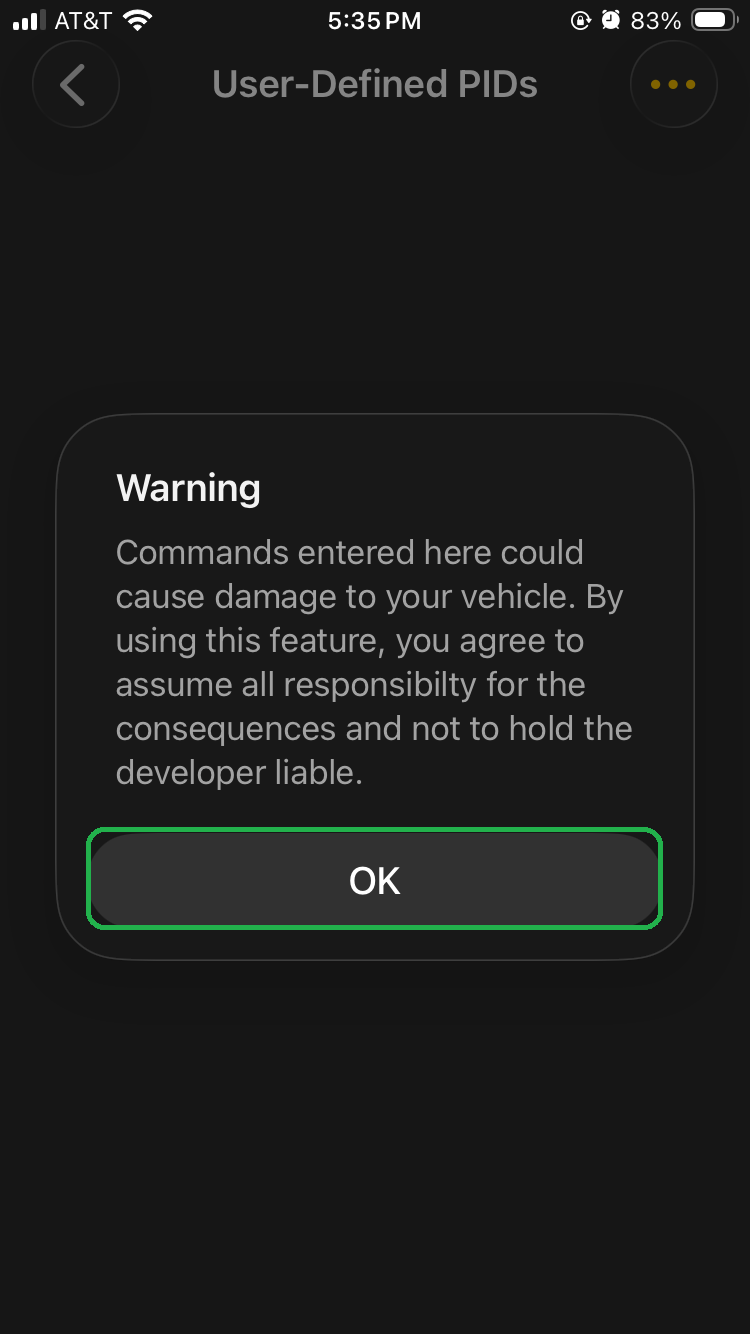
- From the Settings menu, tap User-Defined PIDs and tap OK after you read the Warning message.
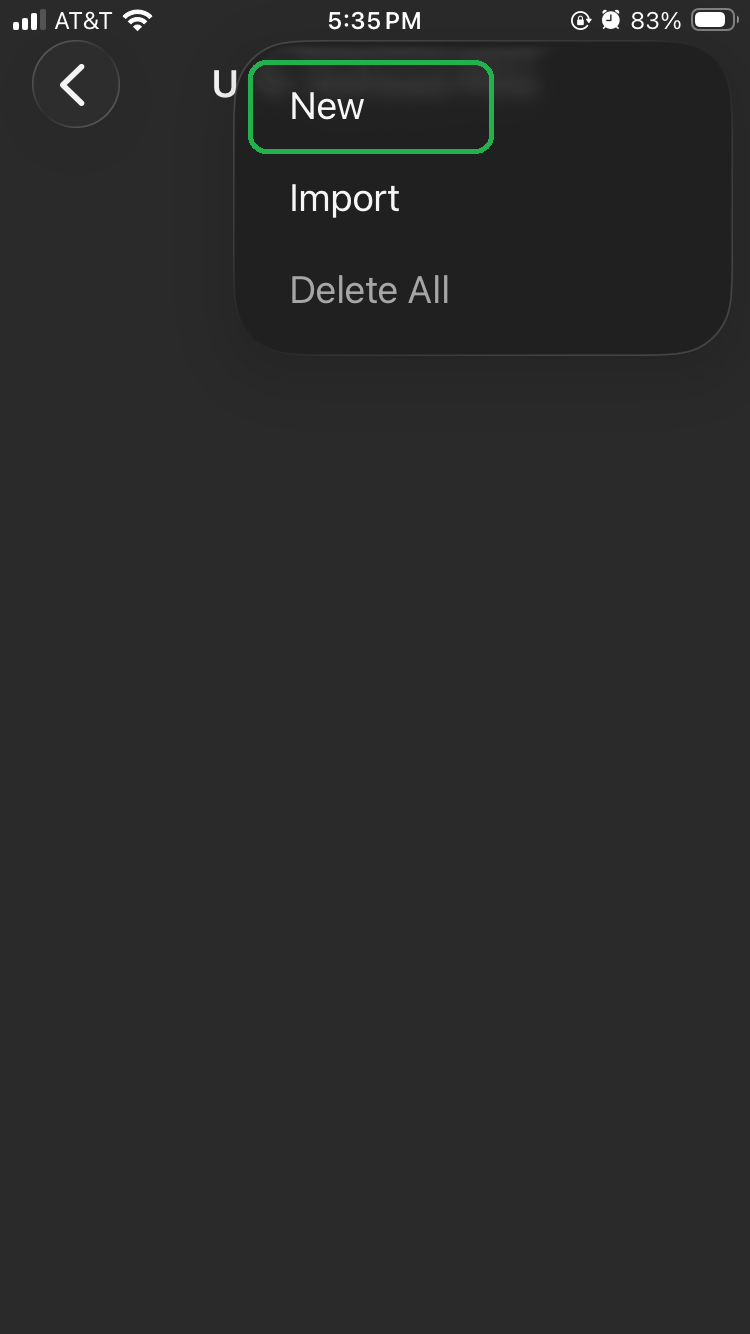
- Tap the 3 horizontal dots (iOS) or 3 vertical dots (Android) menu button in the upper right corner, then tap New.
- Enter information for the PID fields. When you’re done, tap Test.
The OBDLink app reads the PID and displays its value in a Result message.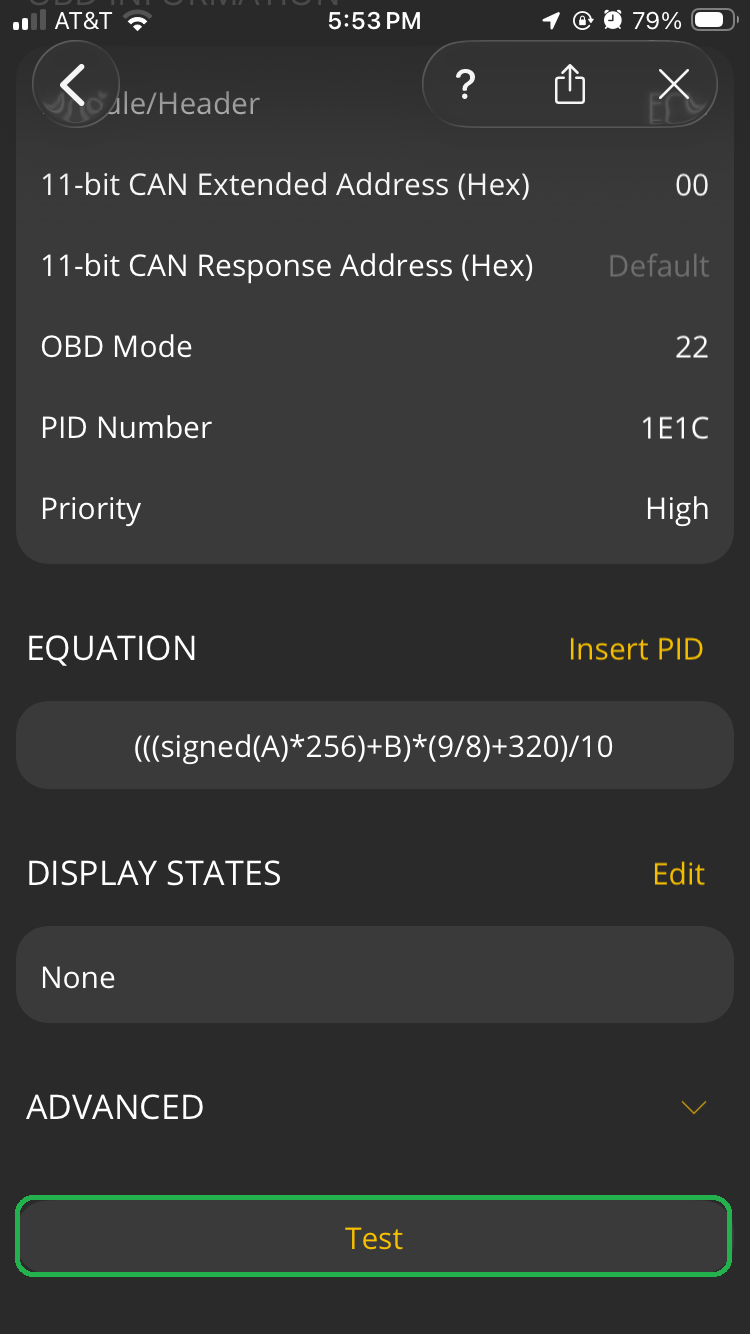
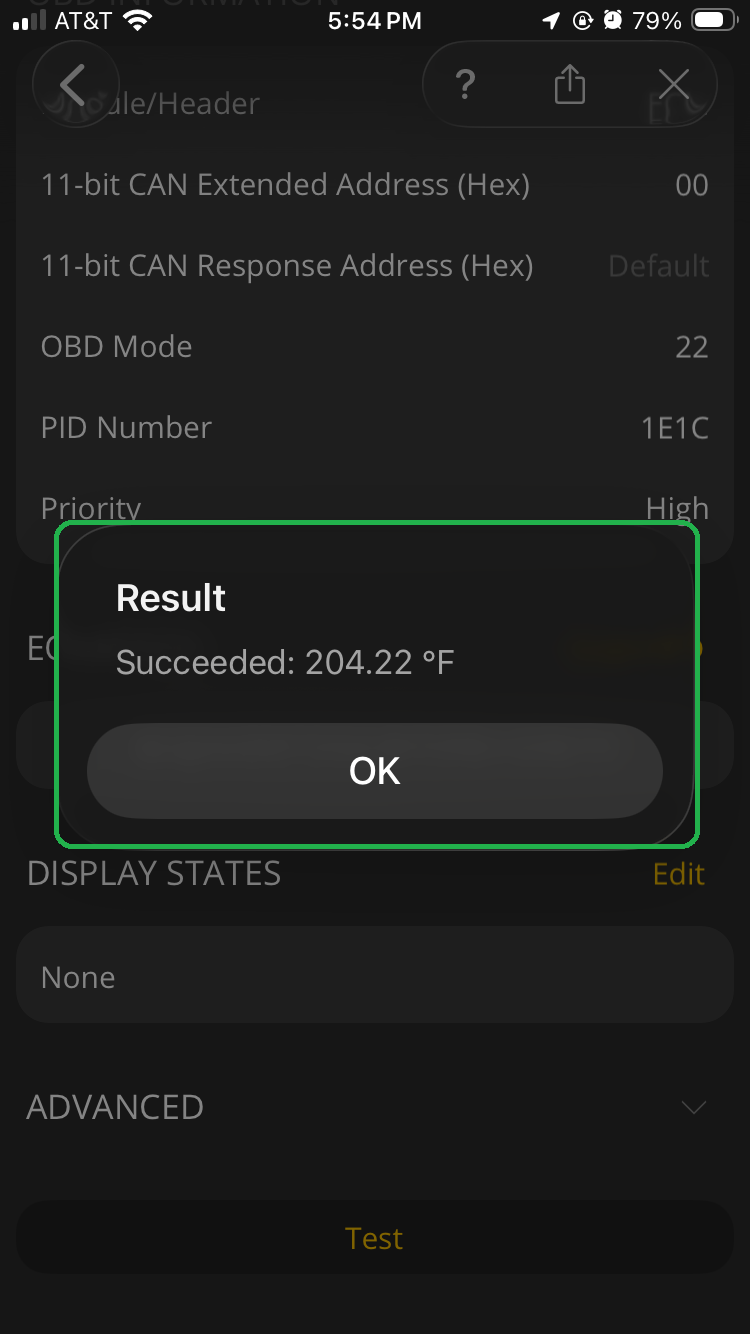
- Tap OK to close the notification.
Tap the back arrow (<) in the upper left corner several times to return to the Home screen.
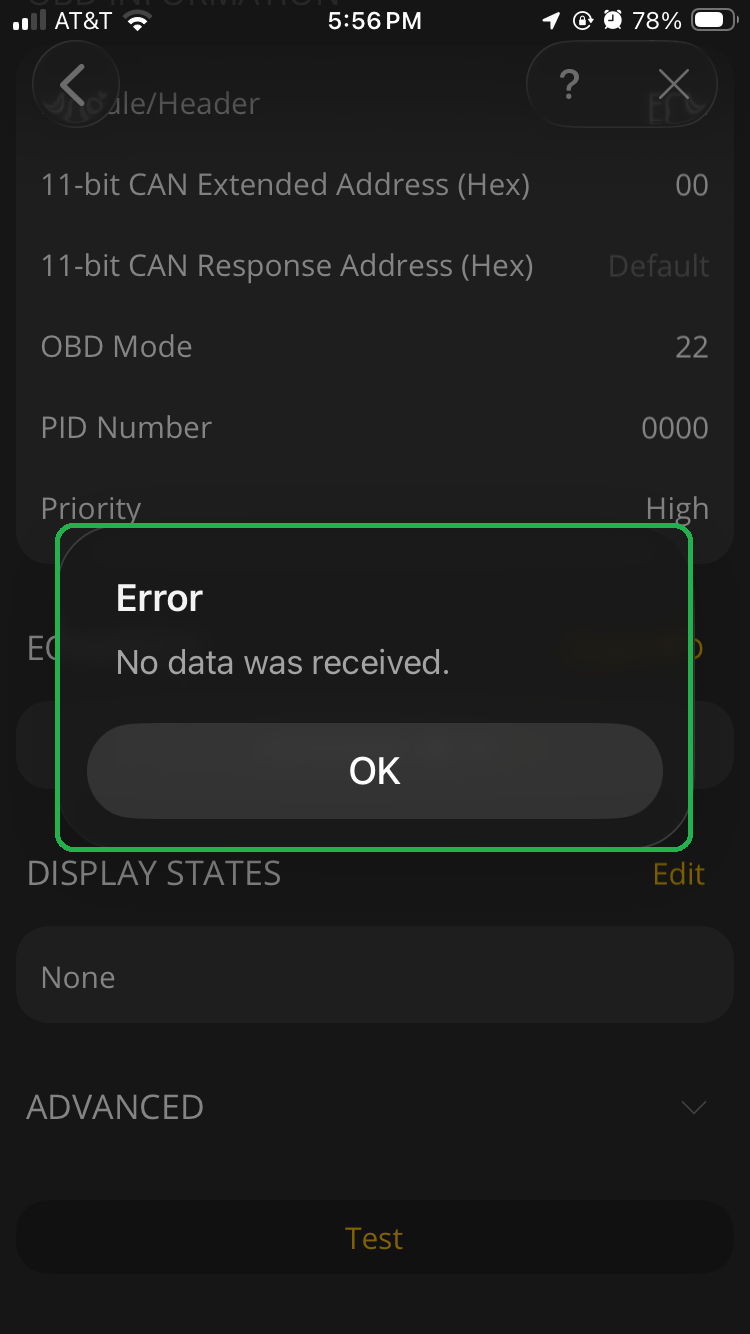
Note: If you see an Error message saying “No data was received”, check the following:
- You may need to change the PID Number or Module/Header value.
- Be sure there are no extra spaces before the first parenthesis symbol ( ) in the Equation.
Acura transmission temperature
The vehicle in this example is a 2011 Honda Odyssey.
INFORMATION
Name: Your custom name
Description: Your custom description
Category: Engine
Manufacturer: Acura
UNITS
Metric Units: C
English Units: F
Metric to English Scale Factor: 1.8
Metric to English Offset: 32
MIN/MAX
Min: -40
Max: 300
Number of Decimals: 2
OBD INFORMATION
Module/Header: ALL
OBD Mode: 22
PID Number: 2201
Priority: Medium
EQUATION
AA*(9/5)-40
Mazda transmission temperature
INFORMATION
Name: Your custom name
Description: Your custom description
Category: Engine
Manufacturer: Mazda
UNITS
Metric Units: C
English Units: F
Metric to English Scale Factor: 1.8
Metric to English Offset: 32
MIN/MAX
Min: -40
Max: 300
Number of Decimals: 2
OBD INFORMATION
Module/Header: ALL
OBD Mode: 22
PID Number: 1E1C (See Note below)
Priority: Medium
EQUATION (See Note below)
((A*256+B)*63/10)/100
Note: If the gauge data seems wrong, try these alternative values:
- PID Number: 1674
- EQUATION: (A*256+B)*5/72-18
Toyota transmission temperature
There are two Toyota PIDs that may be useful for measuring transmission temperature: A/T 1 Pan and A/T 2 Torque.
A/T 1 Pan
INFORMATION
Name: Your custom name (for example, A/T Pan)
Description: Your custom description
Category: Engine
Manufacturer: Toyota
UNITS
Metric Units: C
English Units: F
Metric to English Scale Factor: 1.8
Metric to English Offset: 32
MIN/MAX
Min: 0
Max: 300
Number of Decimals: 2
OBD INFORMATION
Module/Header: ALL
OBD Mode: 21
PID Number: 82
Priority: Medium
EQUATION
((((A*256)+B)*(7/100)-400)/10)
A/T 2 Torque
INFORMATION
Name: Your custom name (for example, Torque Converter)
Description: Your custom description
Category: Engine
Manufacturer: Toyota
UNITS
Metric Units: C
English Units: F
Metric to English Scale Factor: 1.8
Metric to English Offset: 32
MIN/MAX
Min: 0
Max: 300
Number of Decimals: 2
OBD INFORMATION
Module/Header: ALL
OBD Mode: 21
PID Number: 82
Priority: Medium
EQUATION
((((C*256)+D)*(7/100)-400)/10)
Ford transmission temperature
INFORMATION
Name: Your custom name
Description: Your custom description
Category: Engine
Manufacturer: Ford
UNITS
Metric Units: C
English Units: F
Min Value: -20
Max Value: 300
Metric to English Scale Factor: 1.8
Metric to English Offset: 32
MIN/MAX
Min: -20
Max: 300
Number of Decimals: 2
OBD INFORMATION
Module/Header: ECM
OBD Mode: 22
PID Number: 1E1C
Priority: High
EQUATION
(((signed(A)*256)+B)*(9/8)+320)/10
Next steps
- Customize the default gauges and dashboards using the steps in the Add and Edit Dashboard Gauges article.
- In the OBDLink app, tap Settings > Help > Dashboards > Dashboard Management to learn how to set up custom dashboards for different vehicles and reorder dashboards to suit your needs.
Learn more
- You can explore other OBDLink features and functionality using our support article knowledge base.
- For descriptions of terms used in this article, see the Glossary of Acronyms and Terms.
- In the OBDLink app, tap Settings > Help > Settings > User-Defined PIDs to read more about this advanced feature.
- See this Wikipedia article on PIDs that are supported by the SAE OBD-II standard.
Need more help?
OBDLink® is a registered trademark of OBD Solutions, LLC.